
Roles#
On the Roles screen, you can view the list of Roles configured in the system. Roles define the set of accesses and actions that can be assigned to Users.
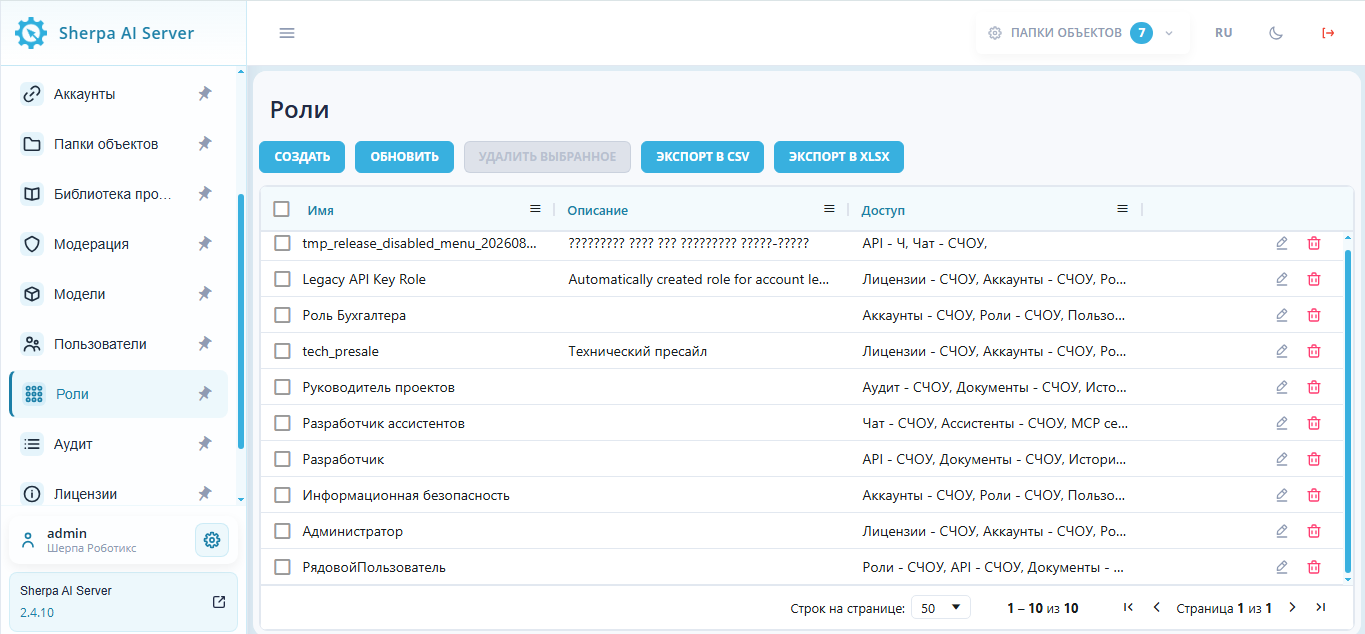
| No. | Interface Element | Description |
| 1. | "Create" button | Allows creating new Roles. |
| 2. | "Refresh" button | Allows forcing a refresh of the "Roles" table. |
| 3. | "Delete Selected" button | Allows deleting selected Roles from Sherpa AI Server. Individual Roles can also be deleted by clicking the A confirmation window appears when deleting Roles. |
| 4. | "Export to CSV" button | Generates a data file of Roles in CSV (Comma-Separated Values) format for import into spreadsheets and accounting systems. |
| 5. | "Export to XLSX" button | Generates a data file of Roles in Microsoft Excel (XLSX) format for import into spreadsheets and accounting systems. |
| 6. | "Name" column | Name of the Role. |
| 7. | "Description" column | Brief description of the Role or its purpose. |
| 8. | "Access" column | List of sections and actions available for the selected Role. |
.png) button in the corresponding row of the "Roles" table.
button in the corresponding row of the "Roles" table.Create Role#
To create a new Role, click the "Create" button in the "Roles" table and fill out the form that appears in the "Role" popup window.
.png)
Fields and checkboxes to fill out in the "Role" popup window:
- The "Main" tab includes fields:
- Name* – a mandatory field for entering the Role name;
- Description – a field for entering the Role description.
- In the "Access" tab, permissions for the selected Role are configured. Here you can specify which system objects the Role will have access to and what operations it can perform.
.png)
On the left side of the tab is a table of access rights. For each object, you can allow specific operations:
| Field | Description |
|---|---|
| Creation | Allows creating new records or objects in the selected section. |
| Reading | Allows viewing data in the selected section. |
| Updating | Allows modifying existing records or objects. |
| Deleting | Allows deleting records or objects. |
Above the table, there are checkboxes "Select All" and "Deselect All," which allow quickly enabling or disabling all rights.
On the right side of the tab, there is a block "Menu Access Depending on Granted Roles." It shows which menu items will be available to the Role based on the selected rights. If access is granted, it means the Role has the necessary rights; if access is denied, it means the rights are missing.
Above the block, there are:
- a hint "Minimum for Login",
.png)
- examples of Roles for Chat.
.png)
They help understand what rights are essential for a User to log into Sherpa AI Server.
If the User does not have any mandatory read rights, login to the system will not be performed.
To save the settings, click the "OK" button; to exit without saving, click "Cancel."
- The "Object Folders" tab includes checkboxes that define specific Object Folders to which the role is granted. The available folders are displayed as a hierarchy tree.
Checkbox structure:- A checkbox on the root folder automatically grants access to all nested folders;
- A checkbox on a nested folder grants access only to that folder.
.png)
Edit Role#
To view and edit a Role, select it from the list and click the button  . After that, the Role editing form will open, where you can make the necessary changes.
In the "Main" tab, in addition to the fields filled out when creating the Role, the GUID (unique identifier assigned to the role after its creation) is indicated in the form during editing. This field cannot be edited.
In the "Access" tab, you can check all objects and operations allowed for this Role.
In the "Object Folders" tab, you can check the Object Folders that are permitted for this Role.