
Users#
In the "Users" section, you can view the list of users who have access to the Sherpa AI Server system. For each user, the login, first name, last name, department, assigned roles, status, and record creation date are displayed. Here you can create, edit, and delete users, as well as import and export the user list.
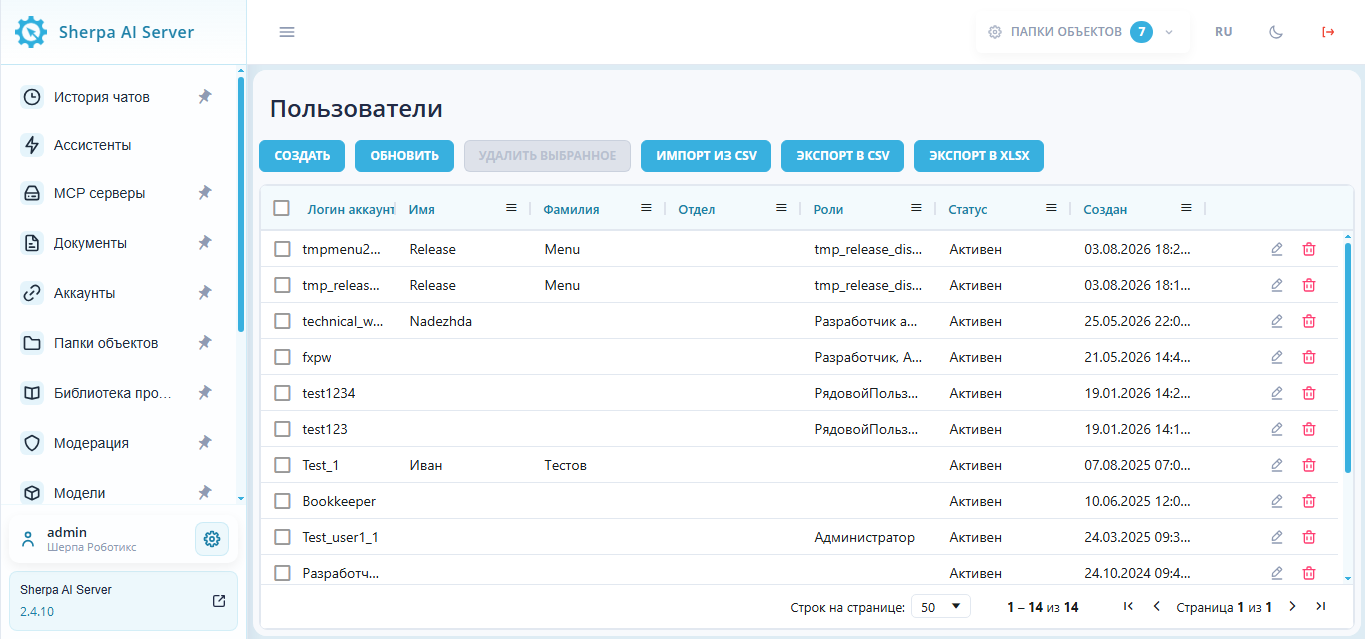
| No. | Interface Element | Description |
| 1. | "Create" button | Allows creating new Users. |
| 2. | "Refresh" button | Forces the "Users" table to refresh. |
| 3. | "Delete Selected" button | Allows deleting selected Users from Sherpa AI Server. You can also delete individual Users by clicking the When deleting Users, a confirmation window appears. |
| 4. | "Import from CSV" button | Allows uploading User data from a CSV file to create records in the Users table. |
| 5. | "Export to CSV" button | Generates a CSV file of User data for import into spreadsheets and accounting systems. |
| 6. | "Export to XLSX" button | Generates a Microsoft Excel (XLSX) file of User data for import into spreadsheets and accounting systems. |
| 7. | "Account Login" column | Unique login associated with the User. |
| 8. | "First Name" column | User's first name. |
| 9. | "Last Name" column | User's last name. |
| 10. | "Department" column | The division or department to which the User belongs. |
| 11. | "Roles" column | Assigned roles for the User that define their access rights in the system. |
| 12. | "Status" column | Current status of the user, e.g., "Active". |
| 13. | "Created" column | Date and time the User was created. |
.png) button in the corresponding row of the "Users" table.
button in the corresponding row of the "Users" table.Create User#
To create a new User, you need to click the "Create" button above the "Users" table and fill out the opened form.
When creating a new User, it is necessary (mandatory) to select a Role for them; otherwise, login under this User will be unavailable.
.png)
The form for creating a new User offers three authentication options, which can be selected by checking the appropriate checkbox:
When creating and/or editing a User, it must be specified which authentication method to use for them.
Edit User#
To view and edit the properties of a specific User, you need to select them from the list and click the button .png) . After that, a form with User settings will open, where you can make the necessary changes. There are no new fields in the form of the previously created User.
. After that, a form with User settings will open, where you can make the necessary changes. There are no new fields in the form of the previously created User.