
Chat#
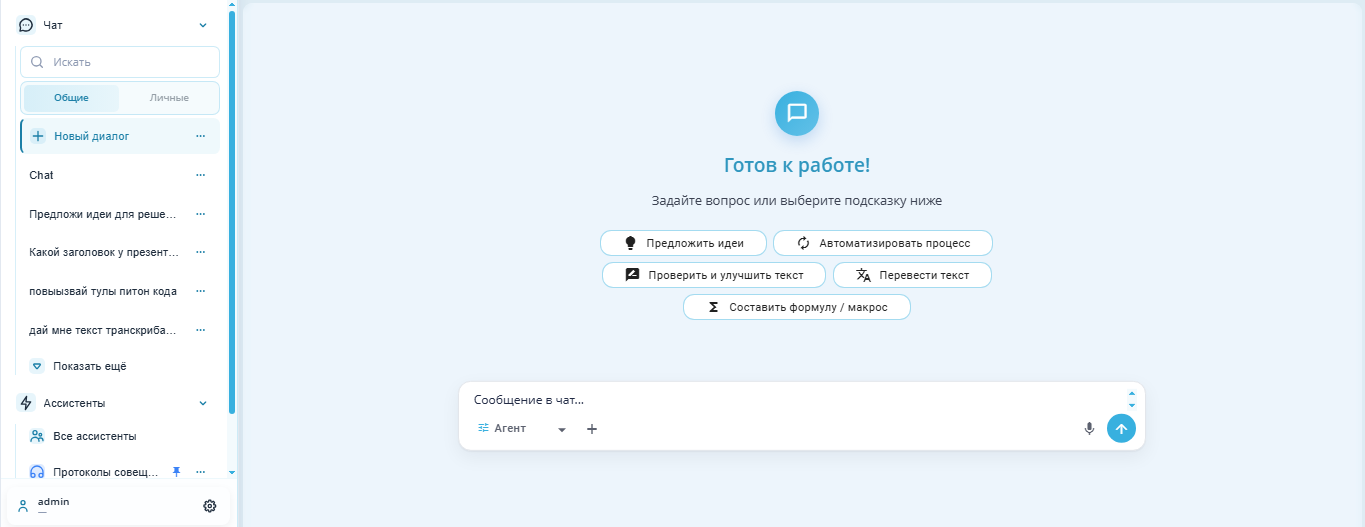
On the Chat screen, a list of dialogues is available. You can switch between the "General" and "Personal" tabs, create a "New Dialogue," select an existing dialogue from the list, or load more by clicking "Show more."
In the central area, the selected Chat opens:
- message history,
- Assistant's responses,
- tool call results,
- message input field.
Processing and Scrolling#
If the Assistant uses tools, calls, results, and intermediate steps are collected in the "Processing" block. The block header can be clicked to expand or collapse the steps. During execution, the current step appears next to the header. After completion, the header shows the number of tool calls, and the Assistant's final response remains separate from the tool history.
Each step has a short, plain-language label in the interface language: Russian or English. For example:
- "Searching the knowledge base" — searching documents;
- "Reading a file" — reading a file from the Chat;
- "Running calculations" — processing data in an isolated environment;
- "Preparing the answer" — preparing the final response.
If the Assistant uses a connected external tool without a predefined label, the step is labeled "Performing an action". Tool names, identifiers, and request data are not shown in step labels.
If a tool reports an error, an explanation appears below the corresponding step: "The step could not be completed. Try rephrasing your request or try again." This explanation appears when a tool returns an error or a calculation fails. Internal error details are not shown in the label. They can be found in the result technical details when needed. Copy and text download buttons are unavailable for tool call messages and their results. The error message refers to a specific step. The Assistant's final response may appear separately.
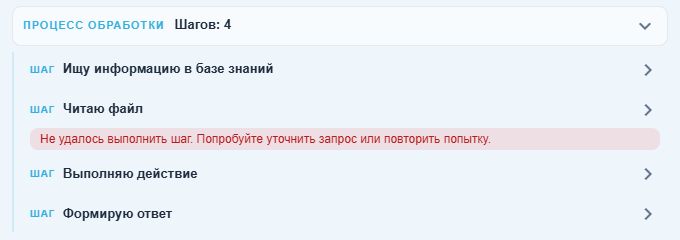
Expanded "Processing" block with step labels and an error message. Interface in Russian.
Technical details can be viewed by clicking the relevant step in the "Processing" block. The expanded step shows "Step technical details" (call parameters) and "Result technical details" if a result has already been received. Steps are collapsed by default. These details help specialists diagnose issues. Regular Users do not need to open them.
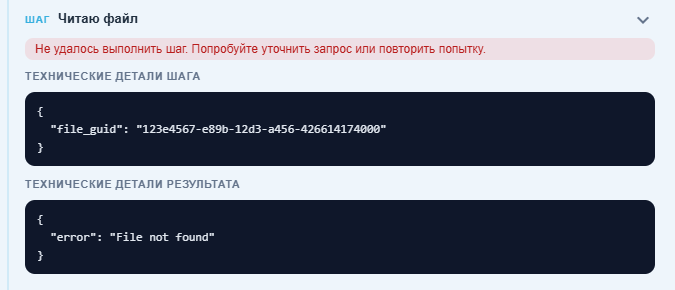
Expanded "Reading a file" step with call parameters and a failed result. Interface in Russian.
When a long response is scrolled up, the Chat does not force the view back to the latest messages. The "Scroll down" button with an arrow at the bottom of the message area returns the view to them.
Chat Artifacts#
The "Artifacts" panel on the right shows files created or available in the current chat session in every chat mode. It is hidden by default. The panel can be opened by clicking the three-dot button in the top-right corner of the Chat area and selecting "Open artifacts". The same menu item is used on narrow screens. The panel can be hidden by clicking  in its top-right corner. The file list refreshes after a run finishes. If a file appears later, the panel can be refreshed.
Model request error#
If a model request fails, the chat shows one error message with a "Retry" button. The "Retry" button can be clicked to retry the request in the same chat. The error remains in history after a page reload or after switching chats. If retrying does not help, the administrator needs the time of the error and the selected model.
"Search" Field#
The "Search" field is located in the left panel of the "Chat" section above the "General" / "Personal" switch.
.png)
It is used to search for dialogues in the Chat list. The user can enter a word, part of a title, or a phrase from the dialogue of interest to quickly find the desired Chat among the available records. The search helps avoid scrolling through the entire list manually, especially if there are many dialogues in history.
The field works in the context of the selected tab:
- if the "General" tab is selected, the search is performed across general Chats;
- if the "Personal" tab is selected, the search is performed across personal Chats.
The field displays a magnifying glass icon and a placeholder "Search," indicating that a search query should be entered here.
"General" and "Personal" Tabs#
On the Chat screen, dialogues are divided into two tabs: "General" and "Personal." This division helps separate Chats available to all Account Users from individual Chats of a specific User.
An administrator can hide the switch with hide_chat_scope_switch in branding.json. A User login then shows personal chats immediately, while an Account login shows shared chats. Search uses the displayed list. To restore manual switching, set the value to false and reload the page.
.png)
General chats are dialogues that are accessible to all Users within one Account. Such a Chat can be created by a User who has access to the Chat section. After creation, the general chat is displayed in the "General" tab for all Users of this Account.
General chats are convenient for collaboration: for example, if a dialogue contains information that may be useful to several Users, or if a common interaction scenario with the Model needs to be preserved.
Personal chats are dialogues that are accessible only to the User who created them. They are displayed in the "Personal" tab only after the User logs in and are not visible to other Account Users.
Personal chats are suitable for individual work: drafts, personal requests, testing formulations, or tasks that do not need to be shown to other Users.
Both types of Chats are created within one Account. The difference lies in visibility:
| Tab | Who sees the chat | Purpose |
|---|---|---|
| "General" | All Account Users | Collaboration and shared materials |
| "Personal" | Only the User who created the Chat | Individual User work |
Users of the same Account can see each other's general chats but cannot see others' personal chats.
New Dialogue#
After clicking the button .png) , the new Chat creation screen opens. In the central area, a welcome block "Ready to work!" is displayed with a prompt "Ask a question or choose a suggestion below."
, the new Chat creation screen opens. In the central area, a welcome block "Ready to work!" is displayed with a prompt "Ask a question or choose a suggestion below."
The User can immediately enter a message in the "Message in chat…" field or select one of the ready-made suggestions:
| Suggestion | Purpose |
| Find information | Helps formulate a request for searching or obtaining information. |
| Check and improve text | Used for editing, checking, and improving text. |
| Write a business letter | Helps prepare the text of a business letter. |
| Formulate a response / letter | Used to prepare a response or letter based on the User's request. |
| Translate text | Helps translate text into another language. |
At the bottom of the screen, there is a message input area.
In the message input area, there is a dropdown list for selecting the working mode. It determines how the User's message will be processed.
The available options in the list are:
| Mode | Description |
| Full-text search | Used for searching information based on available data or documents. |
| Code interpreter | Allows performing tasks related to data analysis, calculations, or file processing using code. |
| Request | Used to send a regular request without selecting a specific Agent or dialogue. |
| Agent | Mode of operation with the selected Agent. The Agent can use available tools and perform actions based on the User's request. |
| Dialogue | Mode for continuing or creating a dialogue considering the context of communication. |
The selected mode is displayed at the bottom of the input field.
The "+" button in the message input area opens a dropdown list of additional actions.
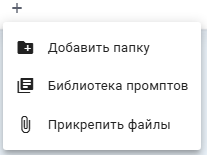
The available options in the list are:
| Action | Description |
| Add folder | Allows selecting a Folder of objects, the materials of which will be used in the dialogue. |
| Prompt library | Opens a library of ready-made prompts for selection and insertion into the message. |
| Attach files | Allows adding files to the message for subsequent processing or analysis. |
You can also enter text, use voice input .png) , and send the message with the button
, and send the message with the button .png) .
.
.png)
Settings#
When clicking the button with three dots next to the "+ New dialogue" item, a popup menu of actions opens.
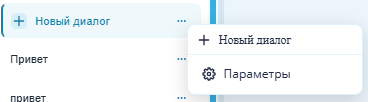
After clicking the "Settings" item, the "Default chat settings" window opens. Here, parameters that will be used for new dialogues by default can be set.

| Interface Element | Description |
| "Model" field | The model that will be used to process messages in the Chat. |
| "Default chat mode" field | The mode of operation that will be selected by default in new dialogues, for example, "Agent". |
| "System message" field | Instruction for the Model that defines the style, language, and response rules of the Assistant. |
| "Temperature" slider | A slider to adjust the variability of the Model's responses. The higher the value, the more diverse and less predictable the responses can be. The lower the value, the more stable and accurate they will be. |
| "Stream responses" checkbox | Enables gradual display of the response as it is generated. |
| "Use reranker for improved search" checkbox | Enables additional ranking of found results to enhance search relevance. |
| "Agent mode: access API via token" checkbox | Allows the Agent to use API access via token in "Agent mode". |
The "OK" button saves the settings. The "Cancel" button closes the window without saving.
Contextual Popup Menu#
After clicking on the three dots next to the selected dialogue, a contextual popup menu opens to the right of the Chats list.
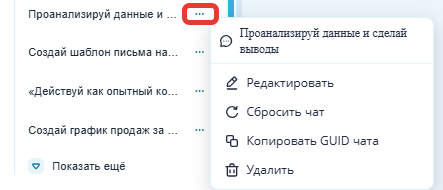
The menu at the top shows the name of the selected Chat. Below are the actions:
- "Edit" — change the name or parameters of the Chat;
- "Reset chat" — clear/restart the current dialogue;
- "Copy chat GUID" — copy the unique identifier of the Chat;
- "Delete" — delete the selected Chat.
Agent Mode#
When "Agent" mode is selected, the Chat can:
- search for information in documents;
- read files;
- use connected MCP servers;
- access permitted API methods if an API token is configured for this.
The user does not need to manually select a tool. They describe the task in plain text, and the Agent determines which capabilities to use to accomplish it. The Agent operates only within the configured tools and access rights.
This mode initiates a chain of actions: the Model receives the task, selects the appropriate tool, invokes it, analyzes the result, and makes the next call if necessary. This continues until a final response is reached or the step limit is reached. In the code, the default limit is 10 iterations and can be configured via MCP_AGENT_MAX_ITERATIONS.
The Agent has access to:
- basic tools of Sherpa AI Server in an isolated environment, viewing Chat files, passing files to the interpreter, reading interpreter files, searching documents, image recognition;
- memory tools if the launch is from the User's GUI session;
- tools of connected MCP servers;
- internal API tools if
Agent mode: access API via tokenis enabled and an API token is selected/configured.
Agent Mode: Access API via Token#
"Agent mode" is a mode in which the Chat can use tools to solve from 1 to 999 tasks. The Agent performs the task not with a single response, but through a chain of steps: selecting the necessary tool, invoking it, analyzing the result, and proceeding to the next action if necessary.
If access to the API via token is enabled for "Agent mode," the Agent can:
- retrieve a list of available internal API methods
/api/v1; - view the description of the selected method;
- perform permitted API requests within the rights of the selected token.
Requests are executed by the server with the rights of the selected API token. The Agent does not receive the raw token and does not invoke arbitrary external URLs: access is limited to permitted API methods and token rights.