
Documents#
Working with Documents requires the Role permission to read Documents and access to the selected files. Creating, changing and deleting items require the corresponding permissions. The "Object Folder" column is available with permission to read Object Folders.
The Documents screen allows you to upload your own files to the Sherpa AI Server document storage and organize them into folders.
This storage features a multi-level folder structure, where each folder can have an unlimited number of attachments (both subfolders and files).
The table below describes the main Documents screen with the default interface appearance settings. Marks and metainfo are hidden in the list. The conditions for displaying them are explained below. Available actions depend on the User’s permissions.
| No. | Interface Element | Description |
| 1. | "Table" mode .png) | Displays documents as rows in a table. |
| 2. | "Tiles" mode .png) | Displays documents as compact cards. |
| 3. | "Large Tiles" mode .png) | Displays documents as enlarged cards. |
| 4. | "Create Folder" button | Allows you to create a new folder for document storage. |
| 5. | "Upload Files" button | Allows you to upload files to the selected folder. |
| 6. | "Download Files" button | Allows you to download selected files. |
| 7. | "Delete Selected" button | Deletes the selected files and folders after confirmation. To delete one folder or file, the User can click the |
| 8. | "Refresh" button | Forces the table on the Documents screen to refresh. |
| 9. | "Document processing" button | Opens the "Document settings" pop-up window to configure image recognition in PDFs and indexing. |
| 10. | "Search Documents" field | Searches files by name, description, and content, and folders by name. The User can use the separate filter to filter by extension. |
| 11. | "Tags" dropdown | Allows you to filter documents by tags. |
| 12. | "Tag matching" dropdown | Appears on the Documents screen when two or more tags are selected. "Any selected tag" finds files with at least one selected tag and is the default. "All selected tags" finds files with every selected tag. |
| 13. | "Extension" field | Allows you to filter documents by file extension. |
| 14. | "Name" column | Displays the name of the folder or file. A folder icon is used for folders. |
| 14.1. | folder expansion arrow .png) | Allows you to expand the folder and view nested items. |
| 14.2. | item selection checkbox .png) | Allows you to select a folder or file for batch actions. |
| 15. | "Description" column | Displays the description of the document or folder, if provided. |
| 16. | "Extension" column | Shows the file extension. |
| 17. | "Tags" column | Shows the tags assigned to the document. |
| 18. | "Created" column | Displays the date and time the item was created. |
| 19. | "Modified" column | Displays the date and time of the last modification of the item. |
| 20. | "Size" column | Displays the file size. For folders, the value may not be specified. |
| 21. | "Status" column | Displays the current processing or availability status of the document. Possible values:
|
| 22. | "Object folder" column | Displays the object folder to which the document or folder belongs. |
| 23. | "View" button | Opens a preview of a file in a supported format. Not displayed for folders. |
| 24. | "Reindex folder" button .png) | Starts reindexing the selected folder. Not displayed for files. |
| 25. | edit button .png) | Allows you to change the parameters of the selected folder or file. |
| 26. | The User can delete button  | Allows you to delete the selected folder or file. |
.png) button in its row and confirm the action.
button in its row and confirm the action.Why a document was found#
It is necessary to enter a query in Search documents. Hover over or select the information icon on a result to see whether the match came from the file name, description, extension, folder name, document text, or meaning. The tooltip lists all applicable reasons and does not show numeric search scores.
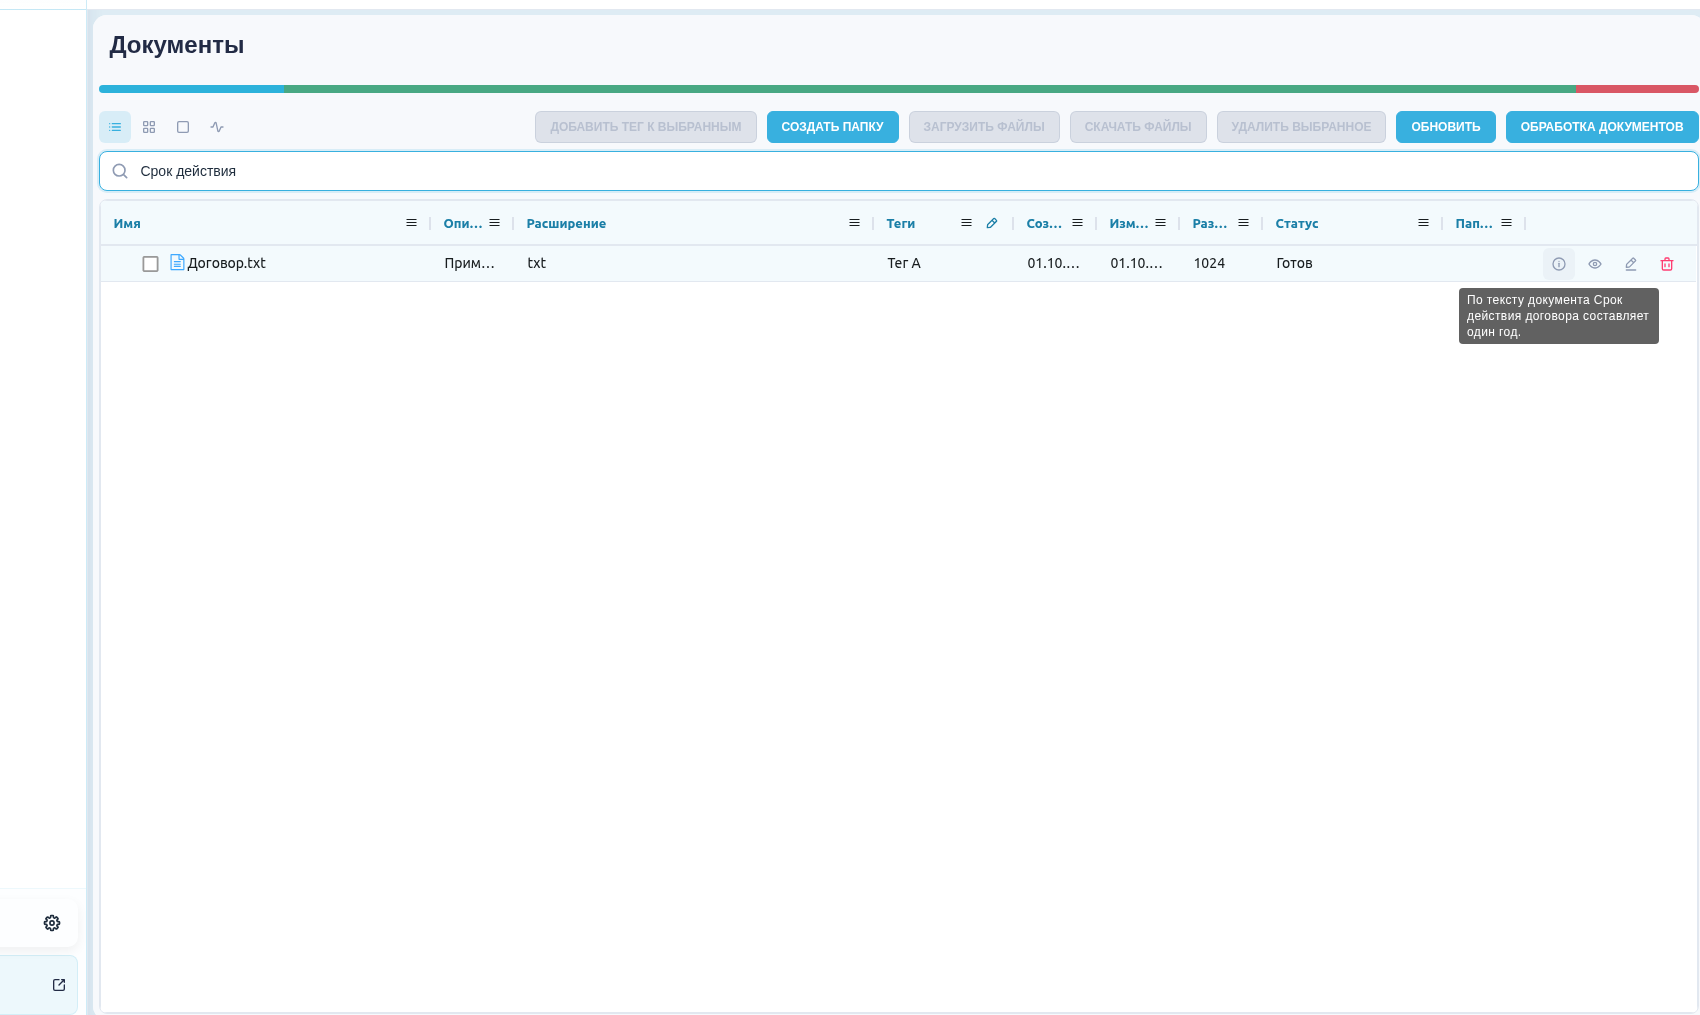
The match reason and retrieved text chunk. Interface shown in Russian.
You can focus the icon with a keyboard or tap it on a touch screen. It is necessary to select View in the table row or tile to open the document. If the search returned a text excerpt, the preview highlights it. Without an excerpt, the document opens without a highlight.

The retrieved chunk is highlighted in the text-file preview. Interface shown in Russian.
Create Folder#
To create a new folder in the table on the Documents screen, the User can click the "Create Folder" button and fill out the opened form.
.png)
The form contains the following elements:
- "Name" * — a required text field for entering the folder name.
- "Folder Analyzer" — a dropdown for selecting an analyzer that automatically processes files in the folder.
- "Description" — a text field for describing the folder contents.
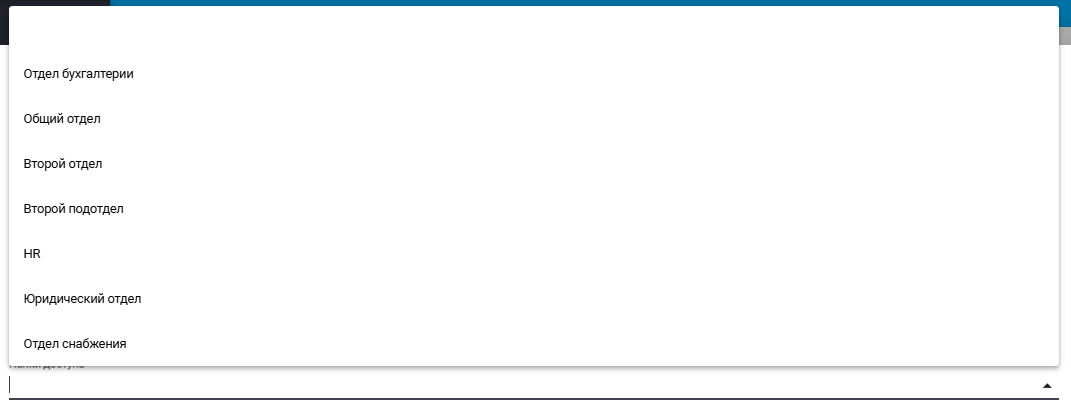
- "Object Folders" — selection of the folder used to process folders and files in conversations with Assistants.
Edit Folder#
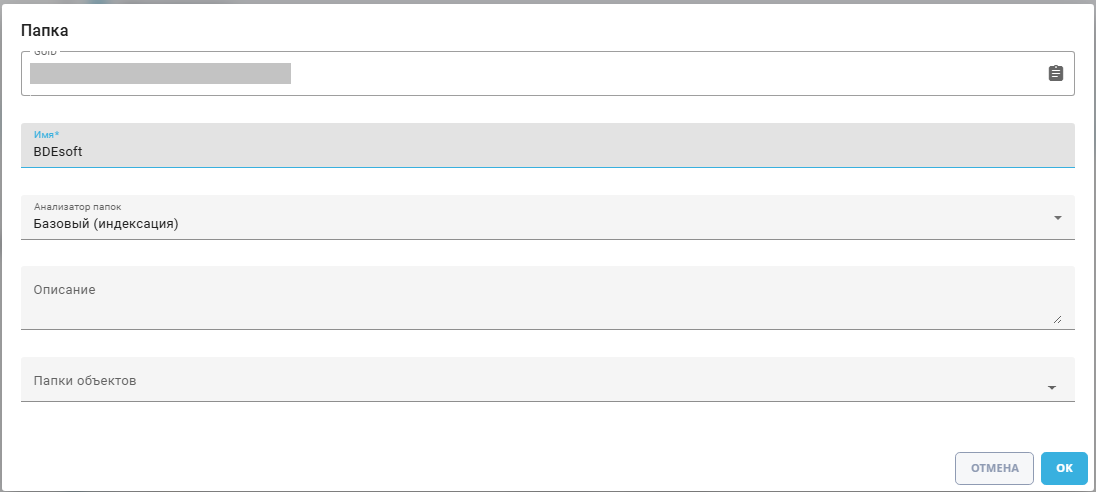
To view and edit the properties of a specific folder, the User can select it from the list and click the button .png) . This will open a pop-up window with the folder settings, where you can make the necessary changes. In addition to the fields filled out when creating the folder, the form includes the GUID (unique identifier assigned to the folder after its creation). This field cannot be edited.
. This will open a pop-up window with the folder settings, where you can make the necessary changes. In addition to the fields filled out when creating the folder, the form includes the GUID (unique identifier assigned to the folder after its creation). This field cannot be edited.
Upload Files#
To upload one or more files to a specific folder, the User can check the checkbox in the row of the selected folder, then click the "Upload Files" button.
.png)
In the file selection pop-up window, the User can select the required files and click the "Open" button.
.png)
During the file upload, a pop-up window will appear showing the progress of each file being uploaded.
After all selected files are uploaded, the User can click the "OK" button.
For .pdf, .docx, .xlsx, and .pptx uploads, the content must match the extension. If the upload dialog reports a validation error, check the format, then rename the file to match its content or upload a valid document. Office archives are limited to 256 MiB after unpacking and 64 MiB for the main XML part; reduce a valid document if it exceeds these limits. Other formats are not covered by this check yet.
.png)
During processing, such a file will have the status "In Processing", then the data from the processed file will be added to the storage, after which the status will change to "Ready". If indexing is not performed (for example, if the scan has no text layer and recognition is not set up), the status will show "Error" with the reason.
Preview a file#
To open a file without downloading it, expand the required folder and click the preview button (eye icon) in the file's row. Action buttons are in the table's last column. If the table is wider than your browser window, scroll right to this column.
The file opens in a dialog. If the button is disabled, check that your role has permission to read documents and that the file format is supported: DOCX, XLS, XLSX, PPTX, PDF, TXT, CSV, PNG, JPG, JPEG, GIF.
For keyboard access, navigate to the table's action column. Tab and Shift+Tab move focus between enabled buttons. It is necessary to press Enter or Space on the preview button to open the file. Disabled buttons are skipped; after the last button, Tab continues through the table.

Preview button in the matched file row. Interface shown in Russian.
The retrieved chunk is highlighted in the text-file preview. Interface shown in Russian.
Download Files#
After selecting files using checkboxes in the documents table, the "Download Files" button becomes active and can be used to download the selected files.
.png)
After clicking the "Download Files" button, the system automatically creates and downloads an archive with the selected files. Only those documents that were checked in the documents table are included in the archive.
Add a tag to multiple files#
Adding a tag requires permission to update Documents and access to the selected files. The button is available when enabled in the interface appearance settings.
A tag is added as follows:
It is necessary to select the required files with checkboxes on the Documents screen. When selecting several tiles on a computer, Ctrl must be held, or Command on macOS. On screens up to 768 px wide, the tiles can be tapped in sequence. The action is unavailable if the selection includes a folder.
The "Add tag to selected" button opens its popup.
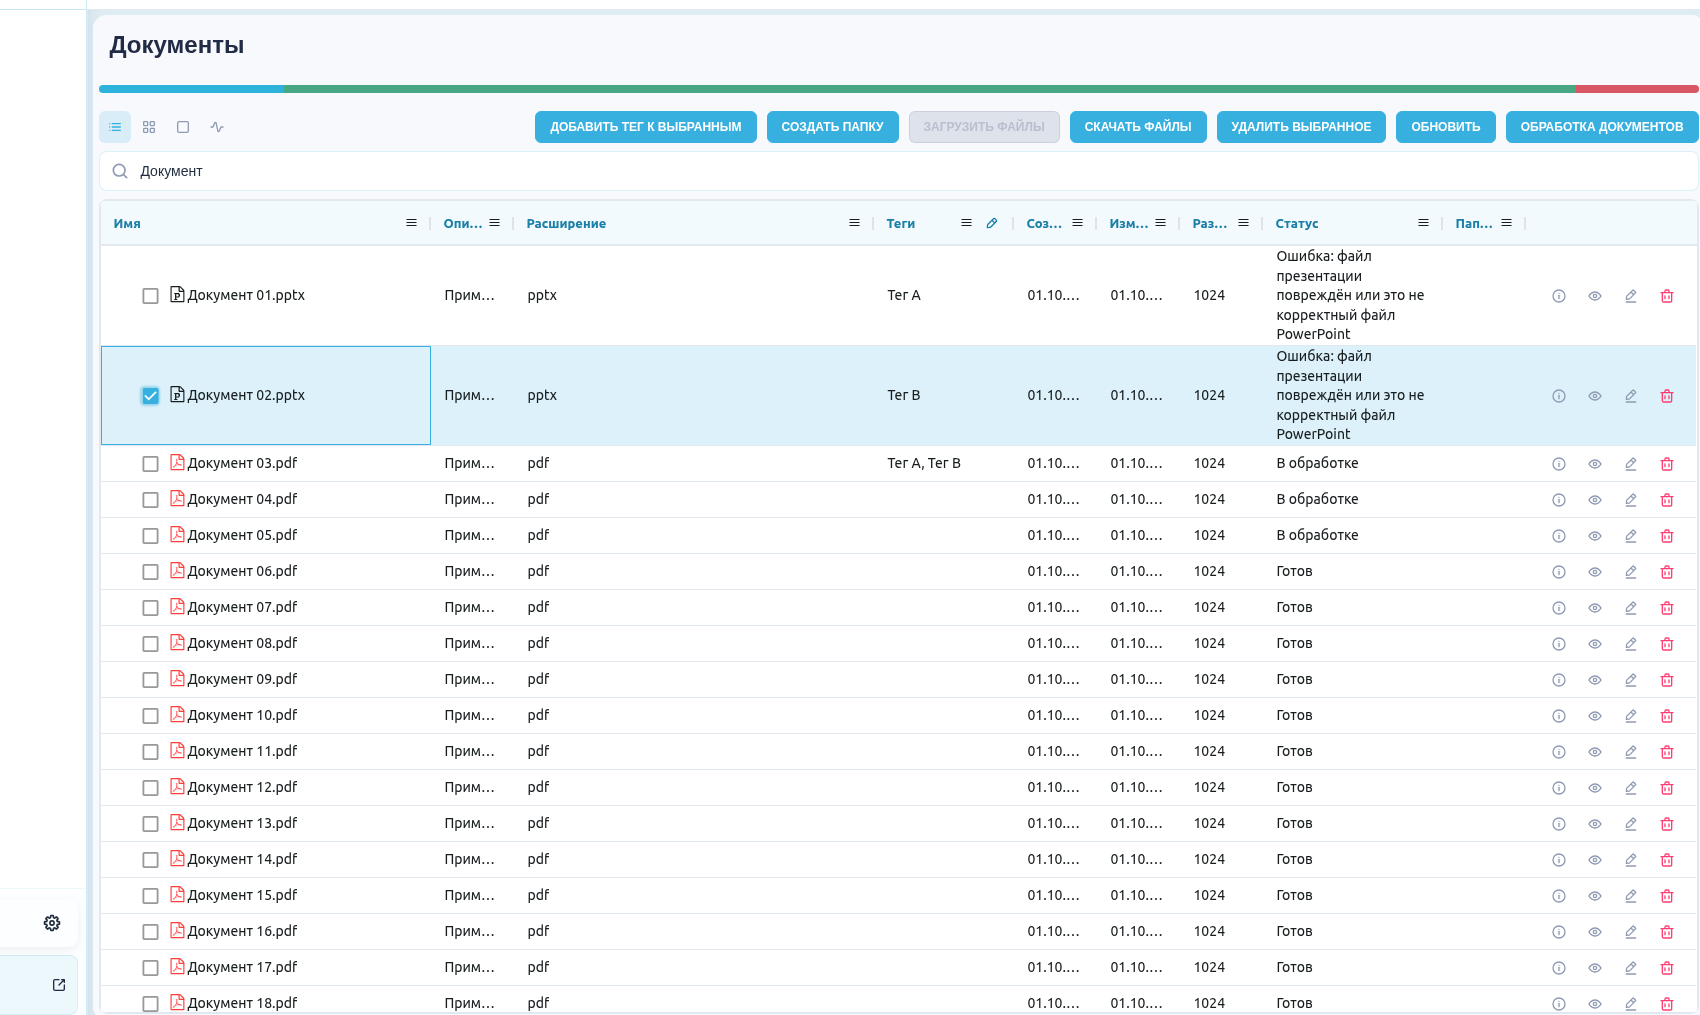
Selected files and the bulk-tag button. Interface shown in Russian.
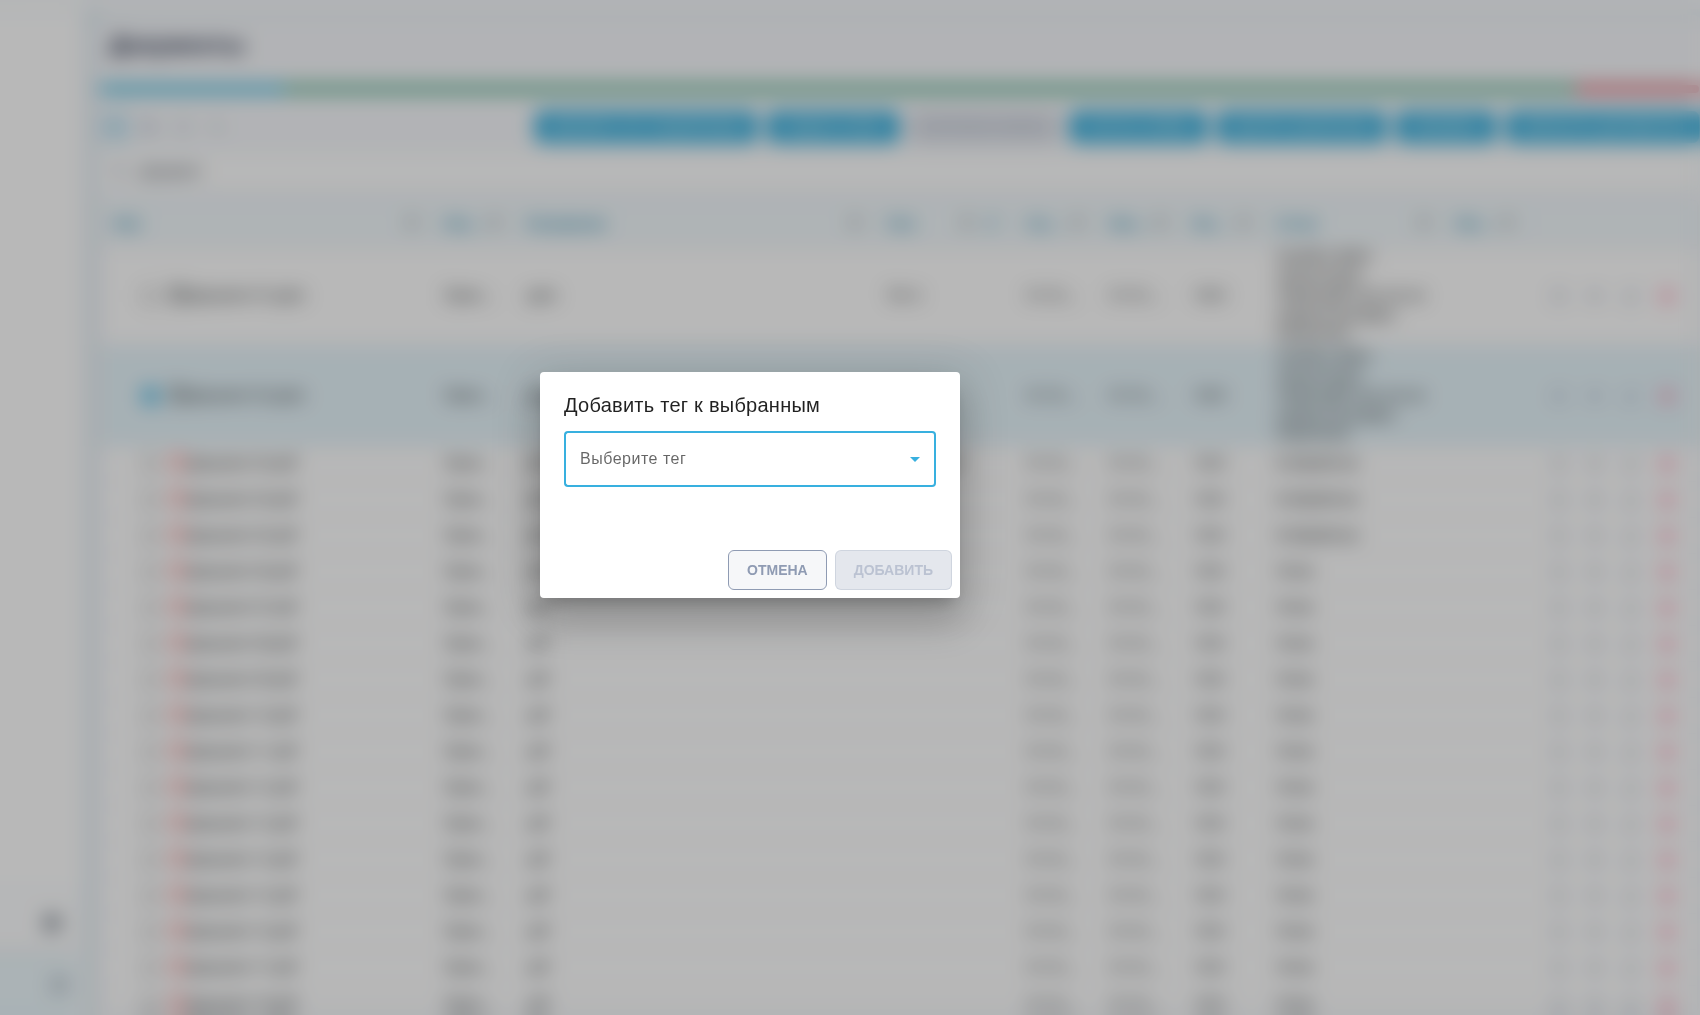
Popup for adding a tag to selected files. Interface shown in Russian.
An existing tag must be selected in "Select a tag", followed by "Add". "Cancel" closes the popup without changes.
The same popup opens from "Add tag to selected" in the right-click menu of the table or tiles. On a selected file, the action applies to the entire selection. On an unselected file, it applies only to that file.
The tag is added to each selected file. Previous tags and marks are retained, and repeated additions do not create duplicates. Tags are displayed as comma-separated text, separately from marks.
The message shows the number of updated files. If some fail, their names are listed. After checking access, "Retry these files" can be used.
Creating a new tag additionally requires permission to create Documents. It can be created through "New tag" in an individual file's card.
Document search and filters#
Tags, marks, extension and metainfo use the filter tab in each column menu. Tags and marks have value lists; extension uses an exact match and metainfo matches text contained in the field. It is necessary to choose "Any selected tag" or "All selected tags" in the main tab of the "Tags" column menu. Selected conditions persist when switching document views.
When a filter is applied, the corresponding column menu button is highlighted. The highlight disappears when the filter is reset. This applies to both document and indexing views.
Branding settings can hide marks and metainfo columns in the table. Saved values remain available; hidden columns can be enabled in the column menu. Metainfo can be edited in the file dialog.
In search results, the explanation button shows match reasons and any available text excerpt. The excerpt is highlighted in the preview; a match by name or folder alone may have no excerpt.
Extension groups#
The extension groups below reflect the default configuration. An administrator can change them in the interface appearance settings.
The filter tab in the "Extension" column menu lists PDF, Word, Excel, PowerPoint, text, image, audio, and video groups. Selecting Word includes DOC and DOCX; Excel includes XLS and XLSX. Expand a group with its arrow to select individual extensions or select the whole group. The selected groups and formats remain visible in the column header after the menu closes.
The extension filter combines with search, tags, and other conditions. It is necessary to select all values in the filter list to clear the restriction by file type. The indexing view has the same "Extension" column filter.
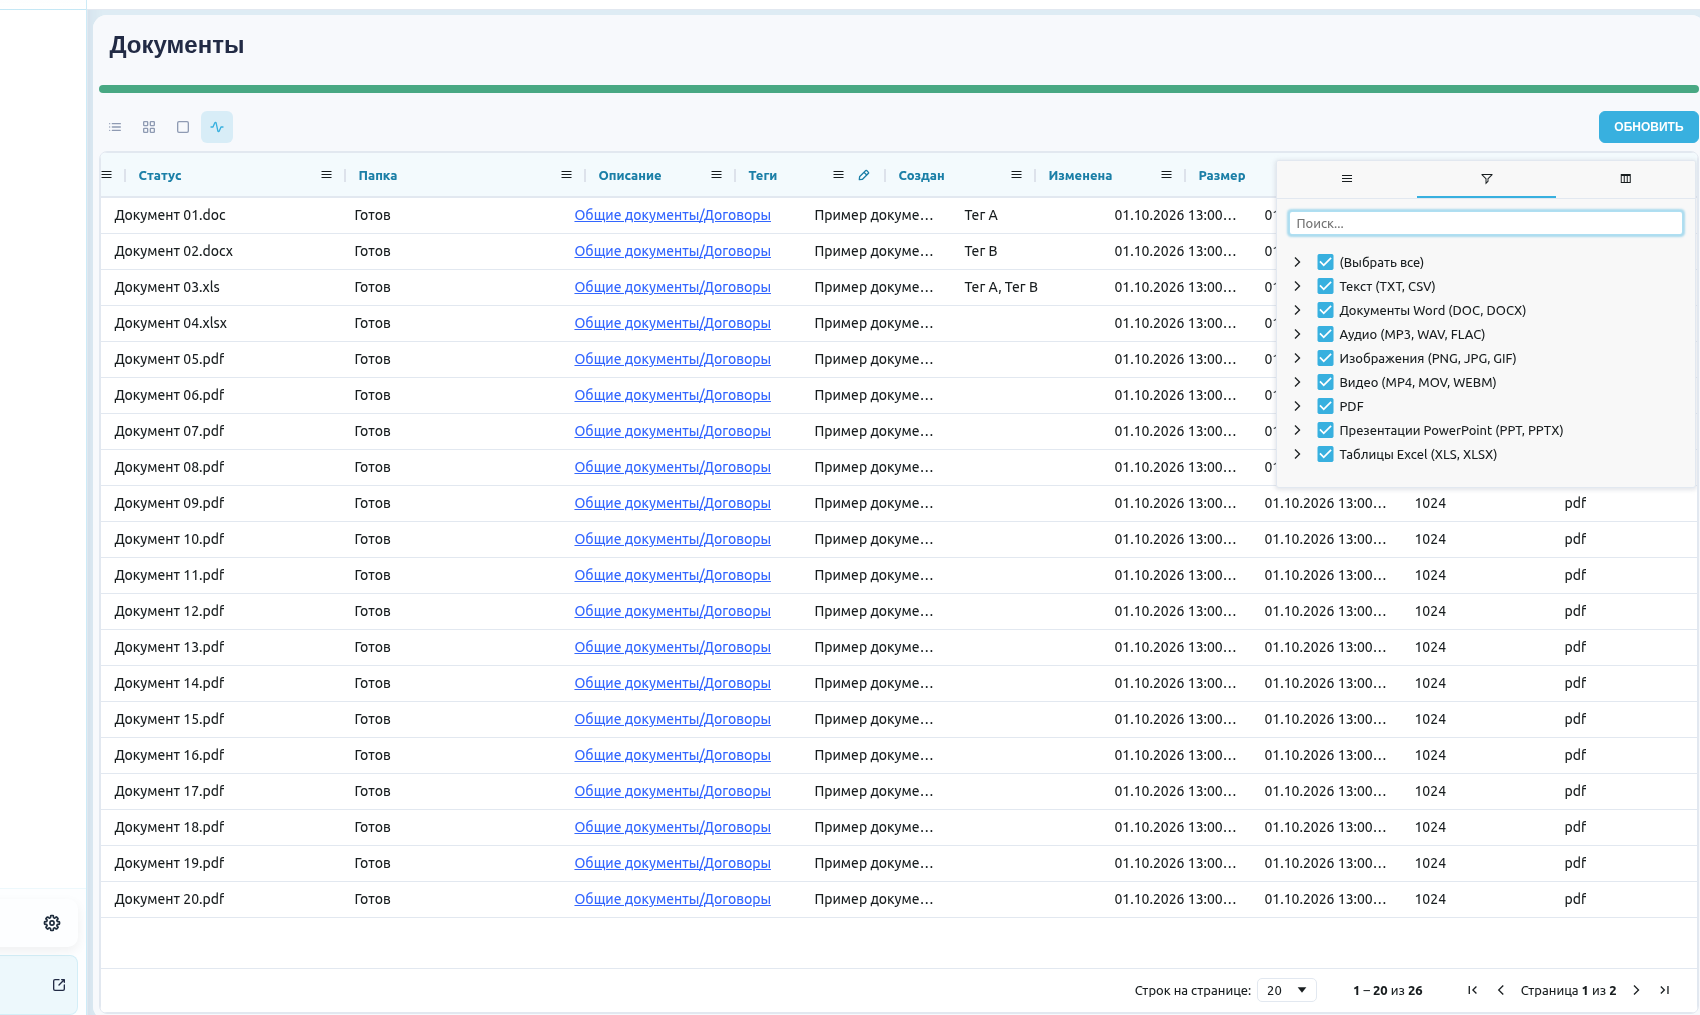
Document indexing#
The "Indexing" button with a pulse icon is next to the three document view buttons above the table. It opens a flat list of files from all accessible folders. To return to folders and files, select table, tiles or large tiles in the same button group. The active view is highlighted. The view buttons are on the left above the table, with action buttons on the right.
The status bar spans the full screen width. Hover over it to open the "Document indexing statuses" tooltip with the total number of accessible Documents, counts for each status and explanations. Keyboard focus also opens the tooltip; its statuses are not buttons. Counts respect the Object Folders selected in the header and the user's permissions. They are independent of the current list page or expanded folder. The bar is also visible in tile view.
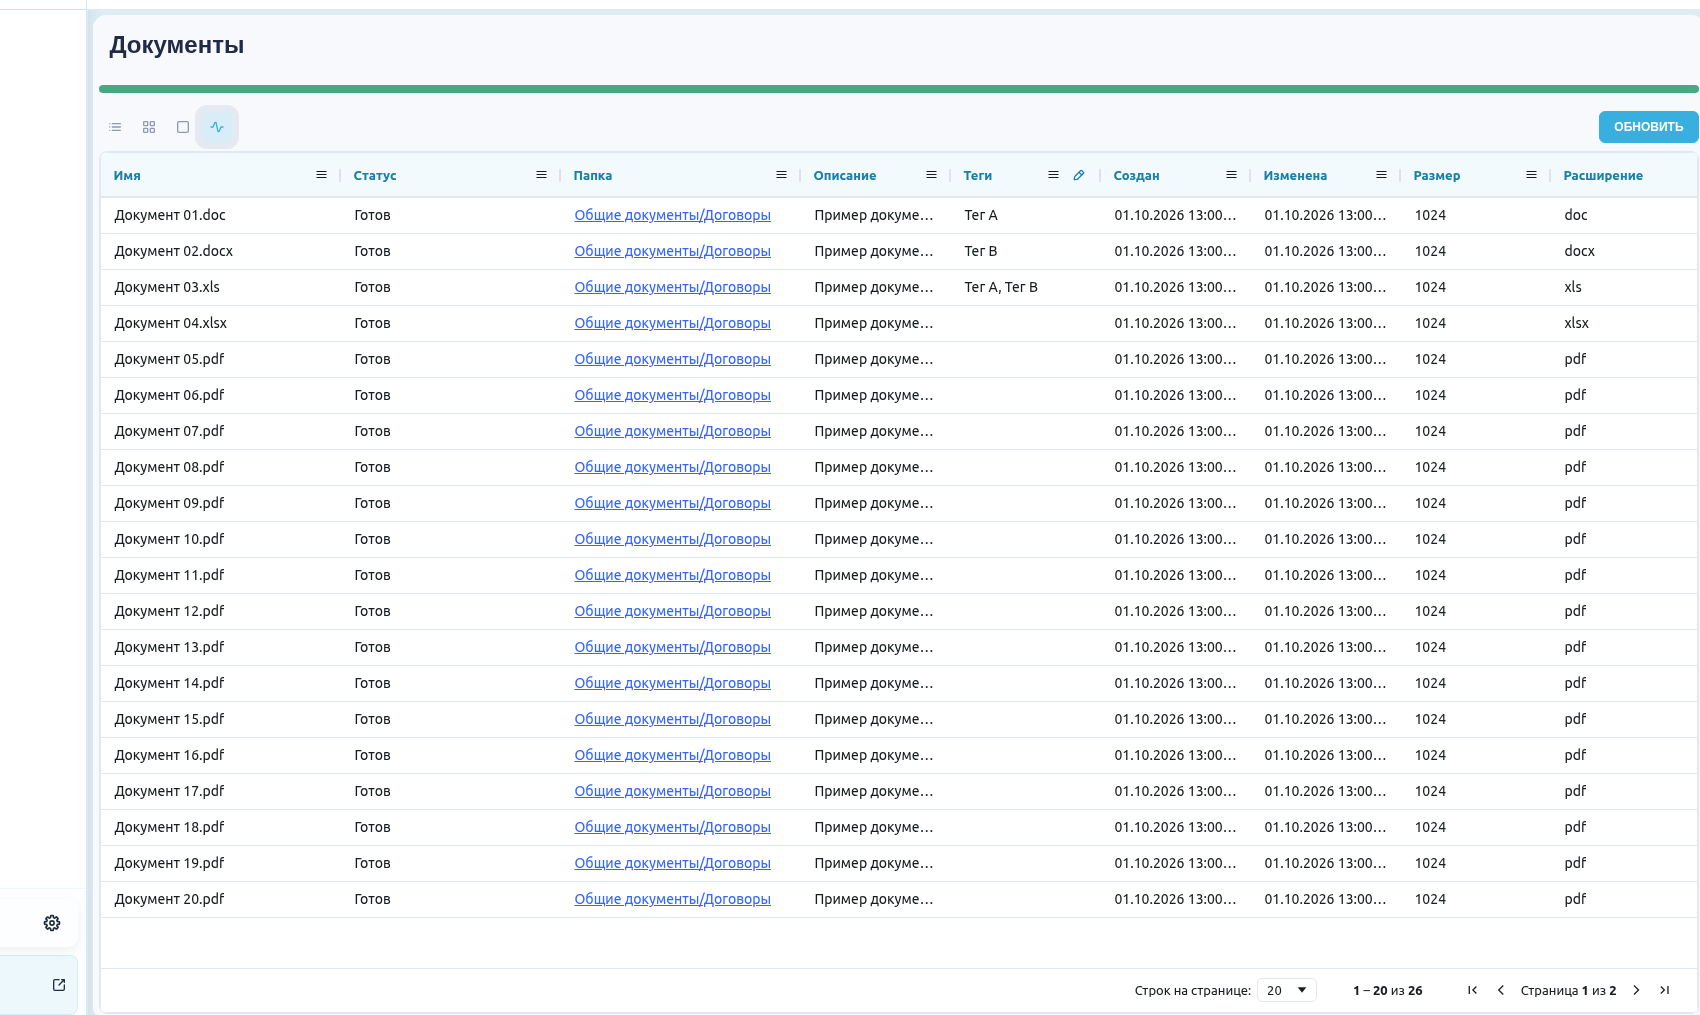
Russian interface with test documents.
| Status | Meaning |
|---|---|
| Pending | The file is queued for indexing. |
| Processing | The file is being indexed. |
| Ready | The file has been indexed. |
| Error | Indexing failed. The file row shows the reason. |
| Awaiting manual indexing | The file is waiting for indexing to be started manually. |
| Not indexed | Indexing is disabled for the file. |
Documents with "Error" status are excluded from search. To find these files in all accessible folders:
- It is necessary to open the Documents screen and select the "Indexing" button above the table.
- It is necessary to open the "Status" column menu, switch to its filter tab and select "Error". If needed, select several values, such as "Error" and "Processing".
- It is necessary to use column menus to filter the list: name, description, status, tags, marks, extension, metainfo, Object Folders, dates and size. Switch list pages; the page size is 20, 50 or 100 files.
- It is necessary to select the path in the "Folder" column to open the file in the "Documents" view. The folder chain expands and the file is selected.
- For a file with "Error" status, select the retry icon with the "Retry indexing" tooltip. The file returns to the processing queue. This action requires permission to update Documents.
On a phone, the list is displayed as cards. The "Refresh" button updates the list and counts. Statuses also refresh automatically while the screen is open; the current page is preserved.
When there are no files, the bar tooltip displays "No documents.". When there are no errors or active processing, the tooltip displays "No indexing errors or documents being processed.". If loading fails, select "Refresh" again.
Document Settings#
The Document processing button opens account-wide settings for new indexing. The pencil in a folder row opens Folder properties.
On the Indexing tab, Currently on this account shows the current model (or built-in embed-server), vector dimension, and any pending transition. If a model is unavailable in the list, its GUID is shown; check access before changing it. Changing the model or dimension replaces stored vectors and queues files; changing only OCR does not remove vectors.
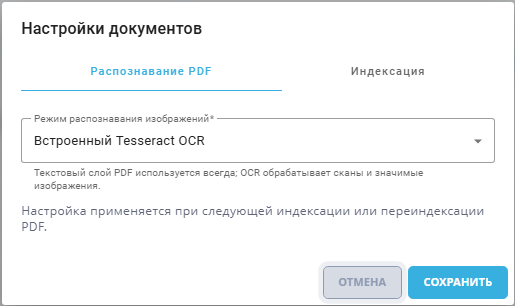
| No. | Item | Description |
| 1. | "PDF Recognition" tab | Tab for configuring PDF document recognition. |
| 1.1. | "Image Recognition Mode" dropdown | Allows you to select the OCR mode for processing images in PDF.
|
| 2. | "Indexing" tab | Tab for document indexing settings. |
| 2.1. | "Indexing Model" dropdown | Allows you to select the standard indexing model. |
| 2.2. | "Chunk size" field | Text chunk size, in characters. Changing it removes saved text chunks and reads files again. Repeating OCR for scans can greatly increase reindexing time. |
| 2.3. | "Chunk overlap" field | The overlap between adjacent text chunks, in characters, must be smaller than the chunk size. Changing it removes saved text chunks and reads files again; scans may require lengthy OCR. |
| 2.4. | "Embedding Dimension" field | The number of components in the vector of the selected indexing model (an integer from 32 to 2000). The value applies to the account and must match the dimension returned by the model. |
| 2.5. | "Delete all vectors and reindex" button | If chunk size and overlap are unchanged, only vectors are recalculated from saved text. Files without saved chunks are read again. Manual indexing must be started manually; files without indexing keep that mode. |
| 2.6. | "Cancel" button | Closes the window without saving changes. |
| 2.7. | "Save" button | Changing the model or dimension recalculates vectors from saved text. Changing chunk size or overlap removes old chunks and reads files again. |
Changing the Indexing Model or Dimension#
A step-by-step scenario and examples of the transition are provided in the instructions for changing the indexing model.
The embedding dimension must match the number of components in the vector returned by the selected model. For example, if the model creates a vector of 1024 numbers, specify 1024. The default value is 384; integers from 32 to 2000 are allowed.
Only one active instance is needed for the indexing model: different instances can create incompatible vectors under the same model name. It is necessary to create the model and instance in the models section, and assign it as the standard for indexing here, in the Document settings.
It is necessary to open Documents → Document processing → Indexing.
It is necessary to select the available Indexing Model and specify its actual Embedding Dimension. Changing only the number in the field does not change the model.
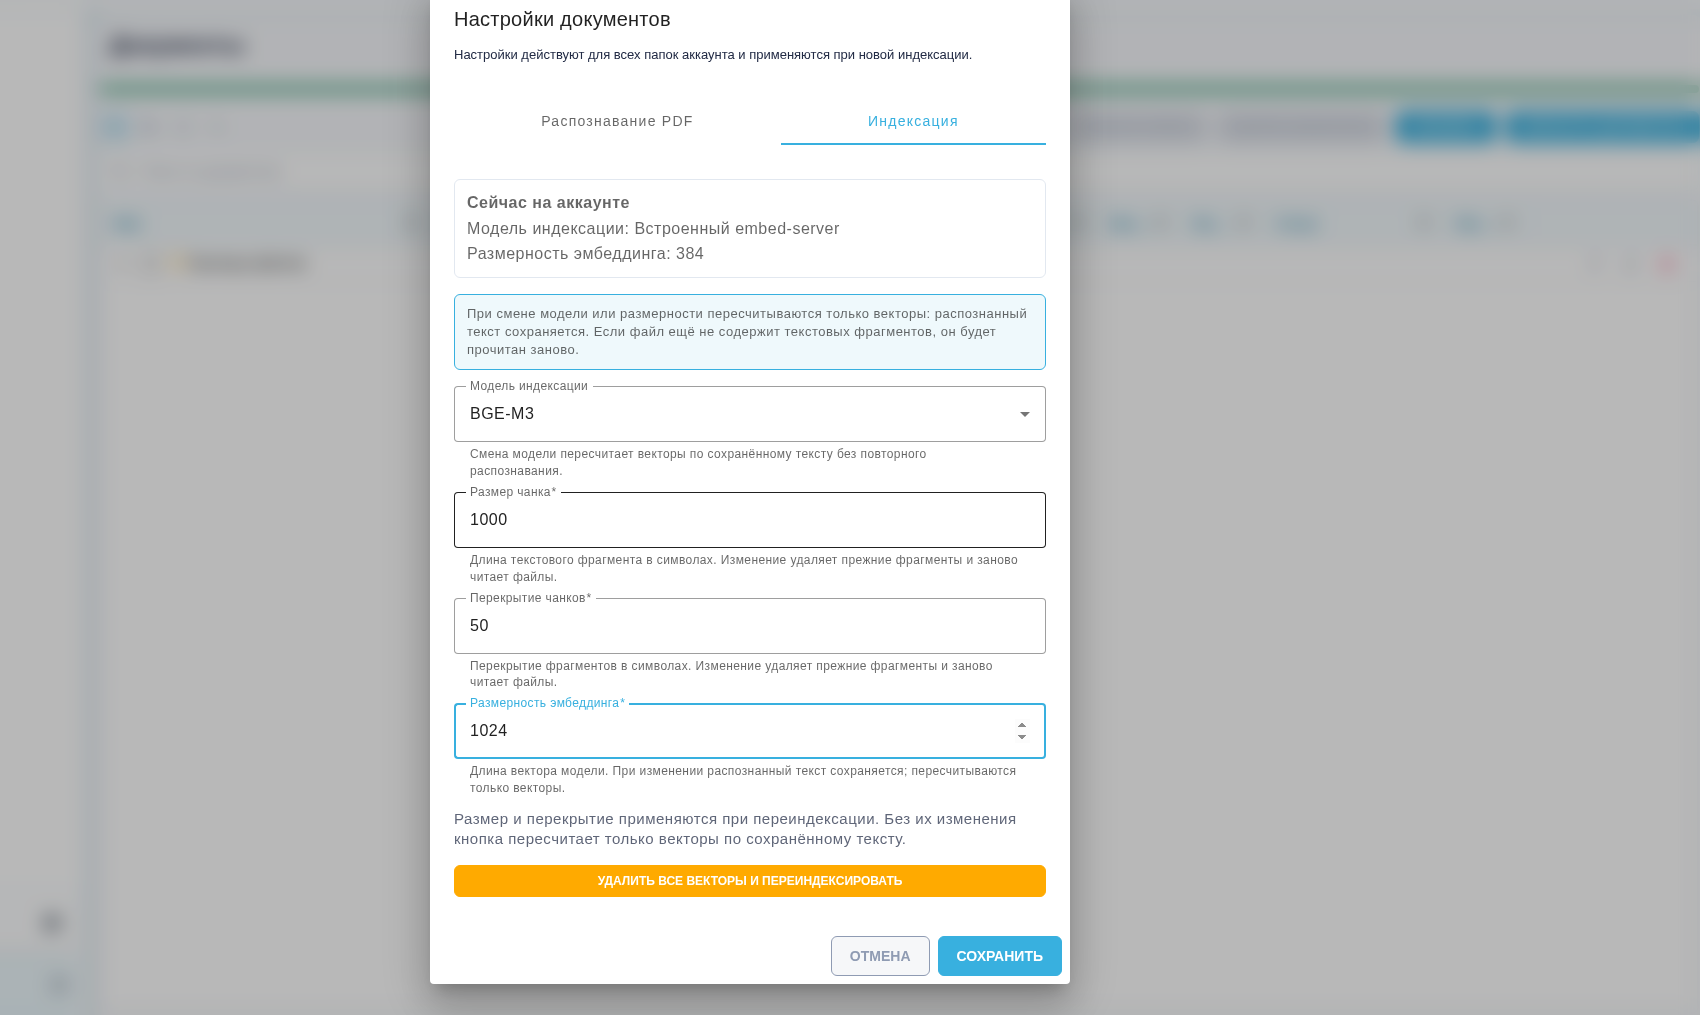
Current dimension 384 and selected dimension 1024 in indexing settings. Interface shown in Russian.
It is necessary to click Save. The system checks that the model is available, returns vectors of the specified dimension, and has a prepared search index. If the check fails, the previous model, dimension, and vectors remain. PDF recognition settings changed at the same time may have been saved separately; reopen the settings after an error. Dimensions 384 and 1024 are prepared during the server upgrade; an administrator must prepare other dimensions. After a successful check, the server replaces old vectors using saved text without repeating OCR. Files without saved chunks are read again. Automatic files are queued and assistant response samples are reindexed. Manual indexing and no-index choices remain in place. The original files are preserved.
It is necessary to wait for the file processing to complete. While the switch itself is not finished, content search is temporarily unavailable; while files are being reindexed, results may be incomplete. The status of the automatically processed file changes from Waiting for processing through In processing to Ready. For a file with the status Waiting for manual indexing, open it and click Reindex, then wait for the status Ready.
Chunks added through POST /api/v1/files/{file_guid}/chunks keep their text and receive new vectors when only the model or dimension changes. Changing chunk size or overlap is rejected when such chunks have no source file. It is necessary to save their text and metadata outside the system, remove those chunks or their file, and retry the chunk change.
When "Chunk size" or "Chunk overlap" changes, a warning icon appears beside the field. Hover over it or focus it with the keyboard to read the explanation. Save removes old text chunks and re-reads automatically indexed files. Scans require OCR again, which can greatly increase reindexing time. If the model or dimension also changes, new vectors are created after the files are read.
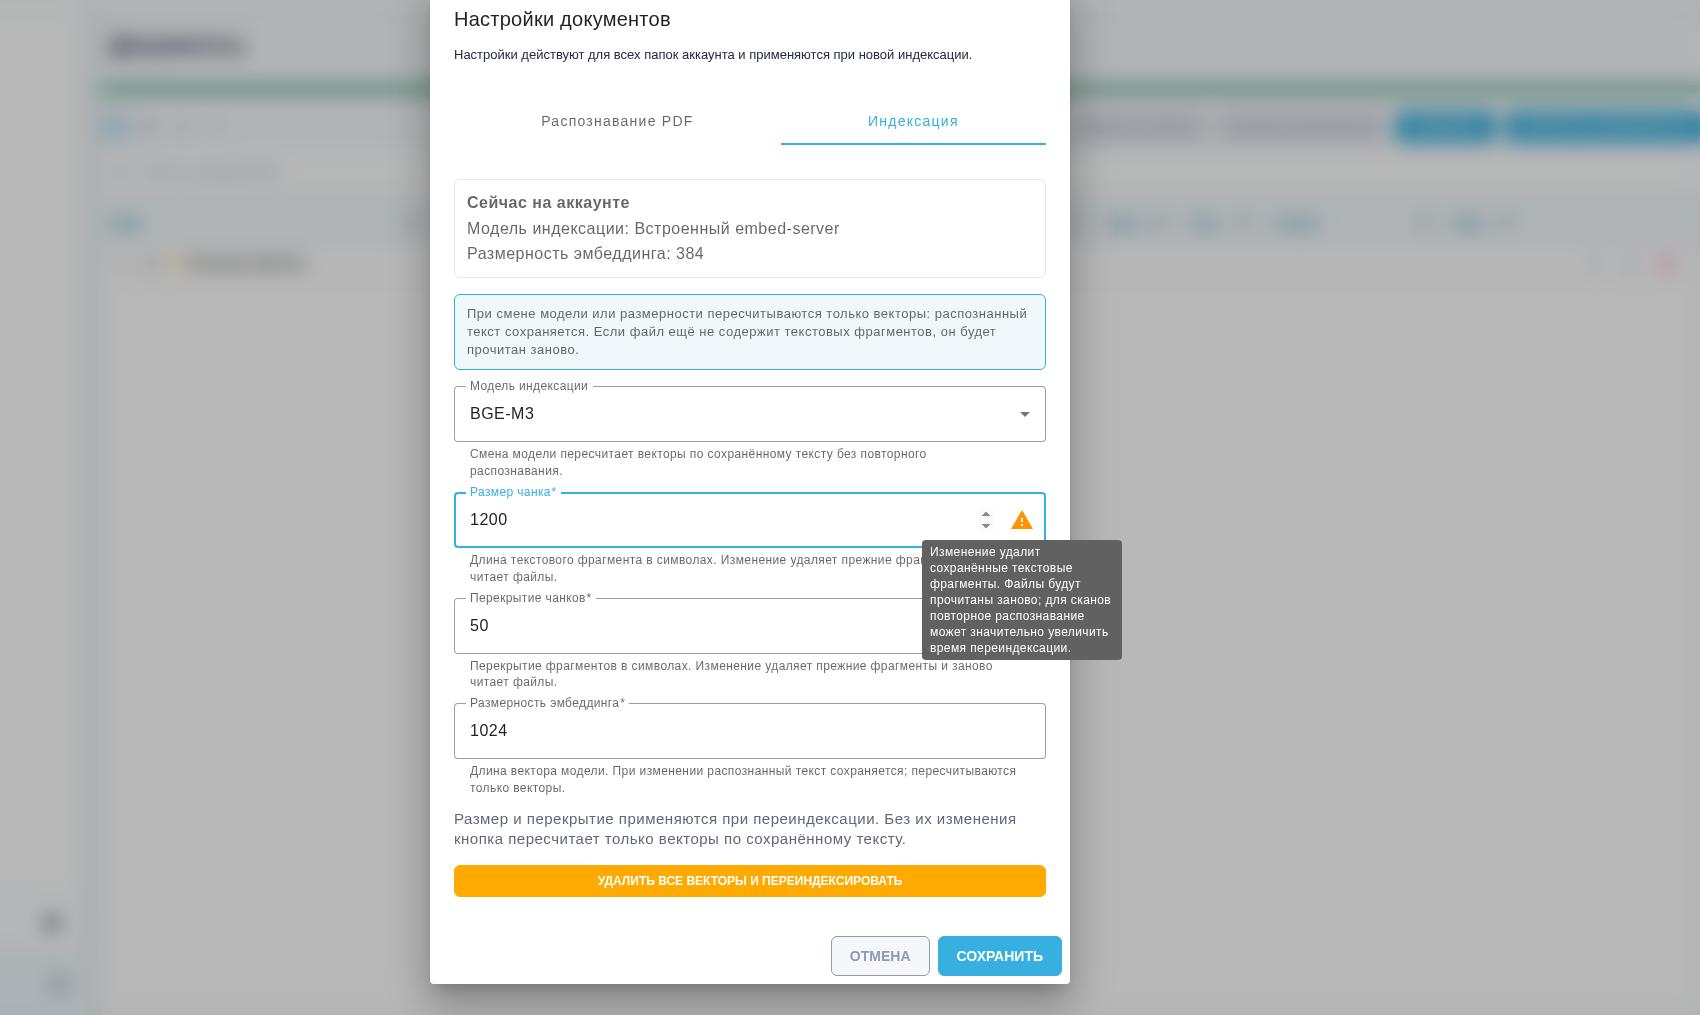
Warning about repeated OCR when chunk size changes. Interface shown in Russian.
If a file shows Error after processing, open the reason and check the availability of the selected model and its dimension. After resolving the issue, click Reindex on that file. If you need to reprocess all files, use the separate button Delete all vectors and reindex. Re-saving the same model and dimension after the transition is completed does not trigger reindexing.
If the transition was interrupted and the settings window shows that it is not completed, repeat saving the same model and dimension: the server will complete the clearing and queuing of files without re-switching; file indexing will continue in the background. Do not select another pair of model and dimension until the transition is complete.
Tags and document search#
Searching requires permission to read Documents and access to the files. Tags are selected in the "Tags" column menu on the Documents screen.
Files can be filtered by tags as follows:
It is necessary to open the "Tags" column menu and its filter tab, then select the required values.
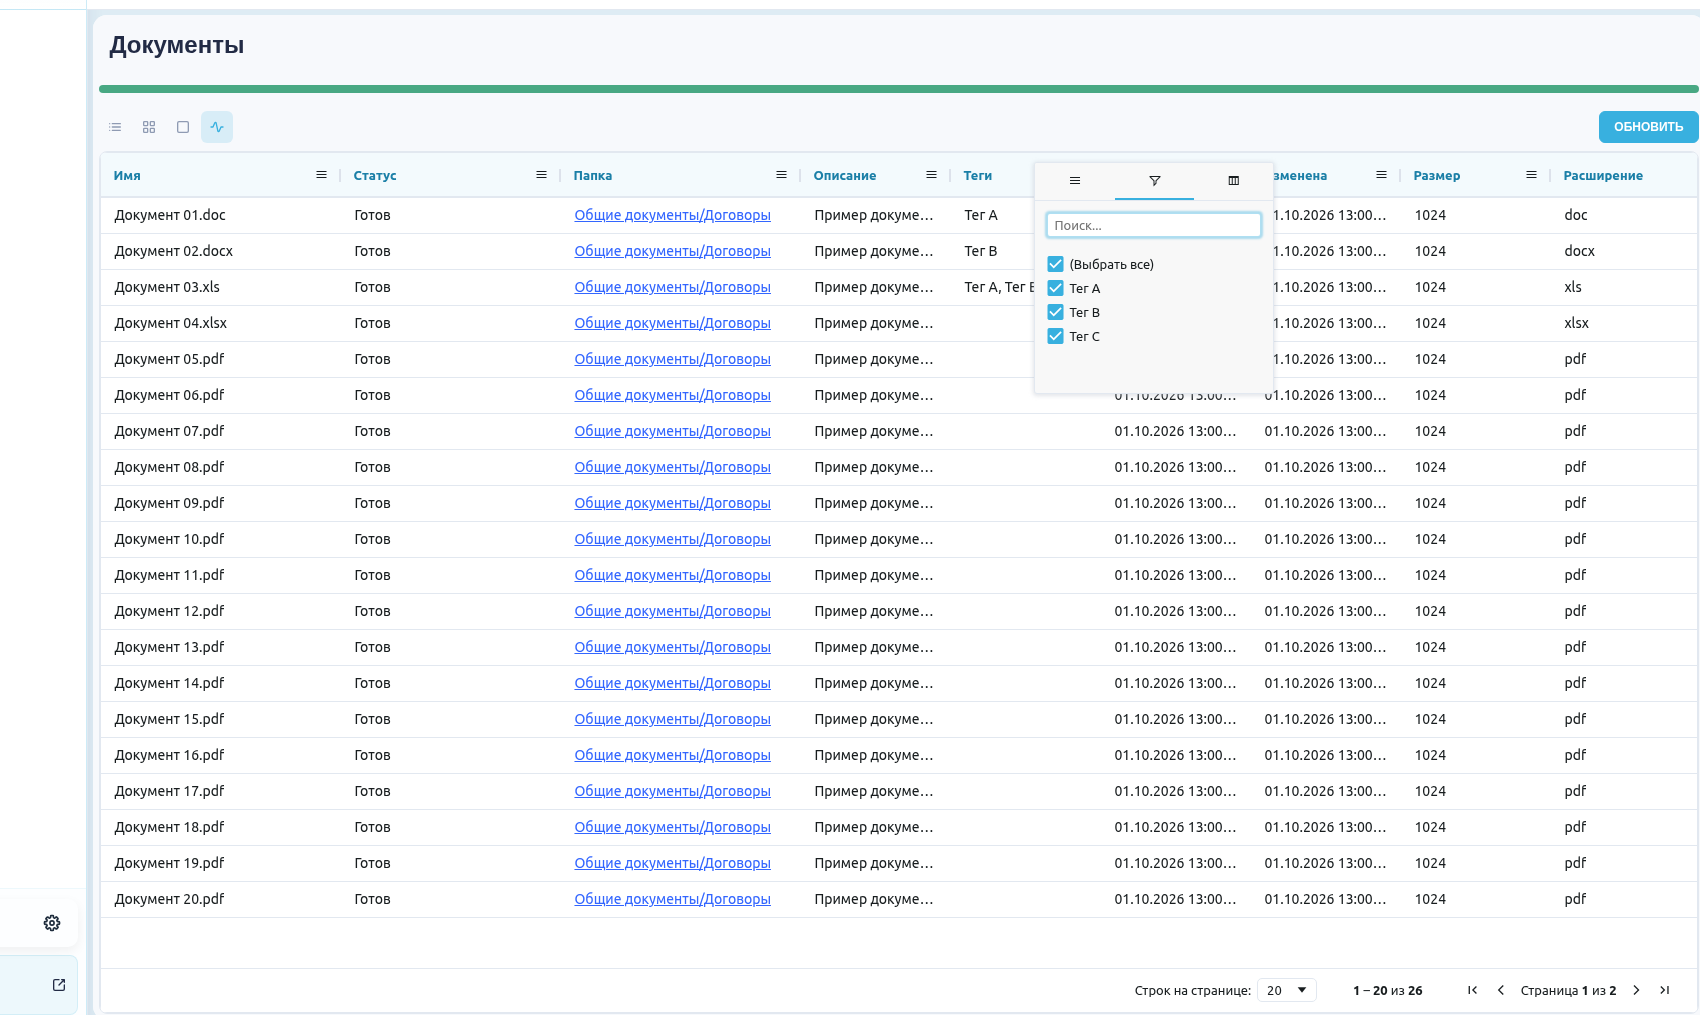
Value filter in the Tags column menu. Interface shown in Russian.
In the main tab of this menu, select "Any selected tag" or "All selected tags". The first rule is the default and keeps files with at least one selected tag. The second keeps only files with every selected tag.
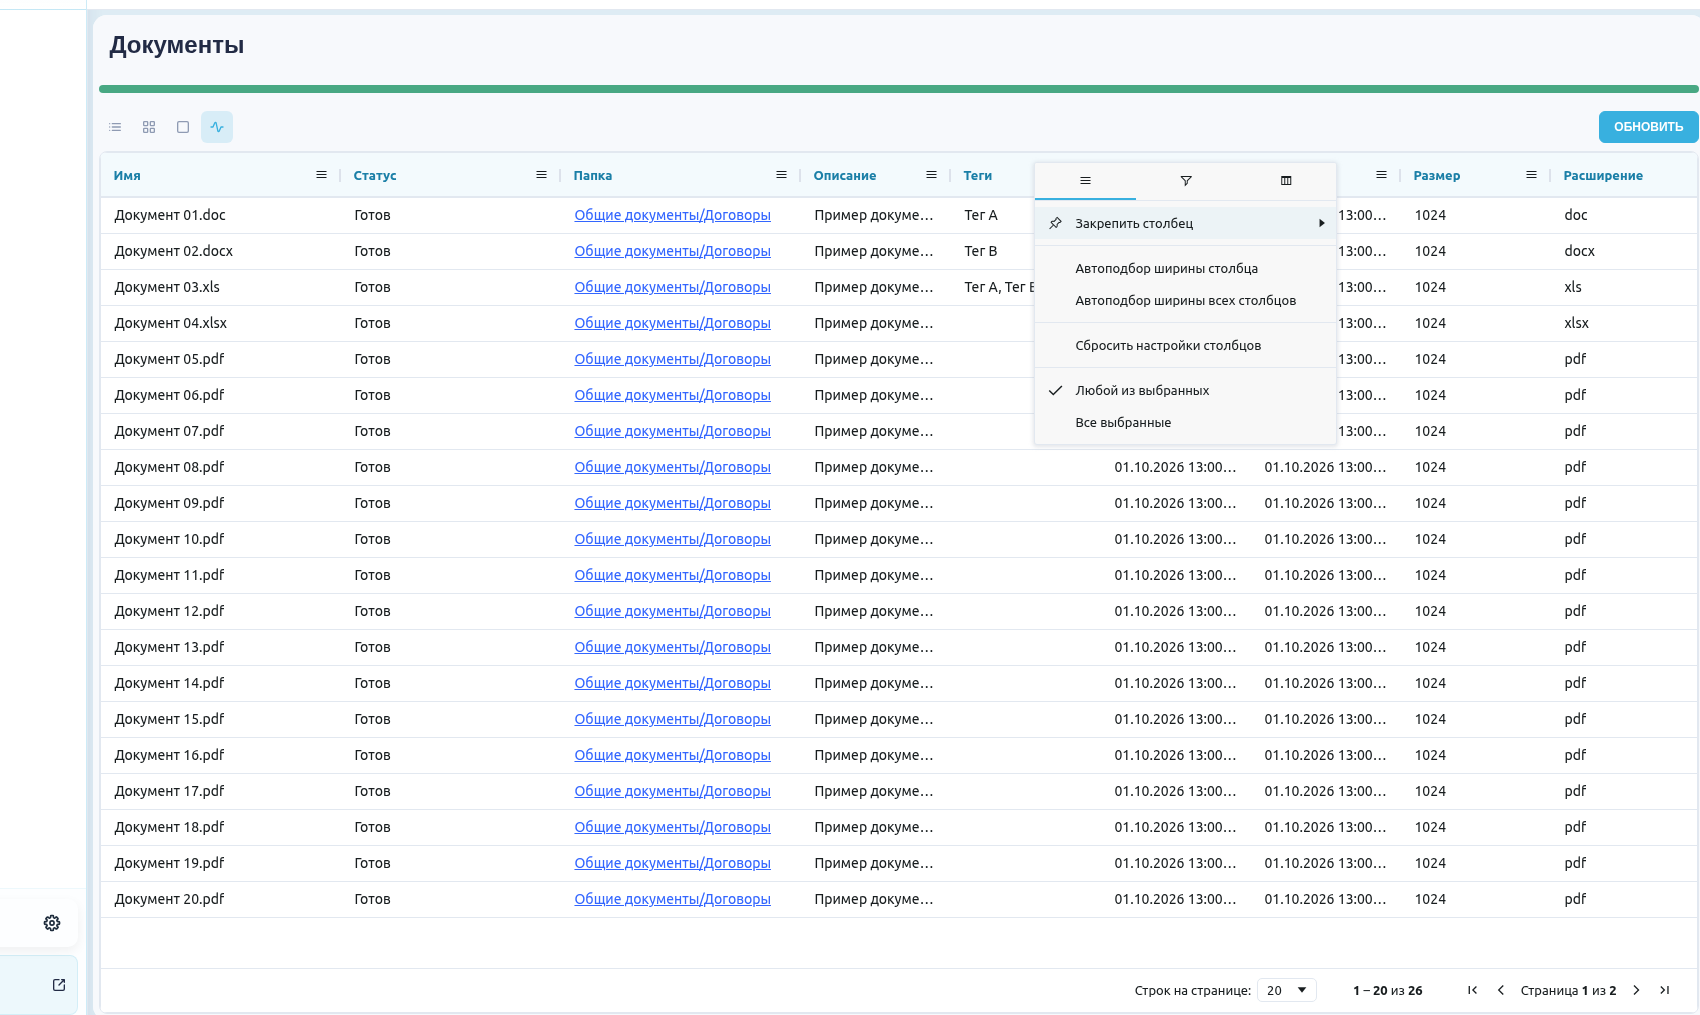
Rules for combining selected tags. Interface shown in Russian.
To remove the tag condition, reset the "Tags" column filter or select all its values. Other search conditions remain applied. Deselecting every value produces an empty file list.
For example, selecting "Contract" and "Signed" with "All selected tags" keeps a file with both tags. A file with only "Contract" is excluded. Other filters continue to narrow the list.
To assign tags, the User can open the file with "Edit", select existing tags or create a tag, and save the file details. Editing requires document edit permission. Filtering requires read permission. If the required file does not appear in the search results on the Documents screen, the User can check its assigned tags in the file details and the selected mode in the "Tag matching" dropdown on this screen.
By default, marks are hidden on the Documents screen: the filter, table column, tile chips, and edit dialog do not show them. An administrator can show marks again by setting hide_document_marks to false in the interface appearance settings. Existing marks remain assigned when a file is edited. Integrations can still read marks and use the server-side mark_guids filter through the API.
File metainfo#
The "Metainfo" field remains in the file details. To set or change it, the User can open the file details using "Edit" on the Documents screen, enter a value such as "Series 17", and save. After the file details are reopened, the entered value remains in the "Metainfo" field. The "Metainfo" field is empty for a file without a value. Editing requires document edit permission.
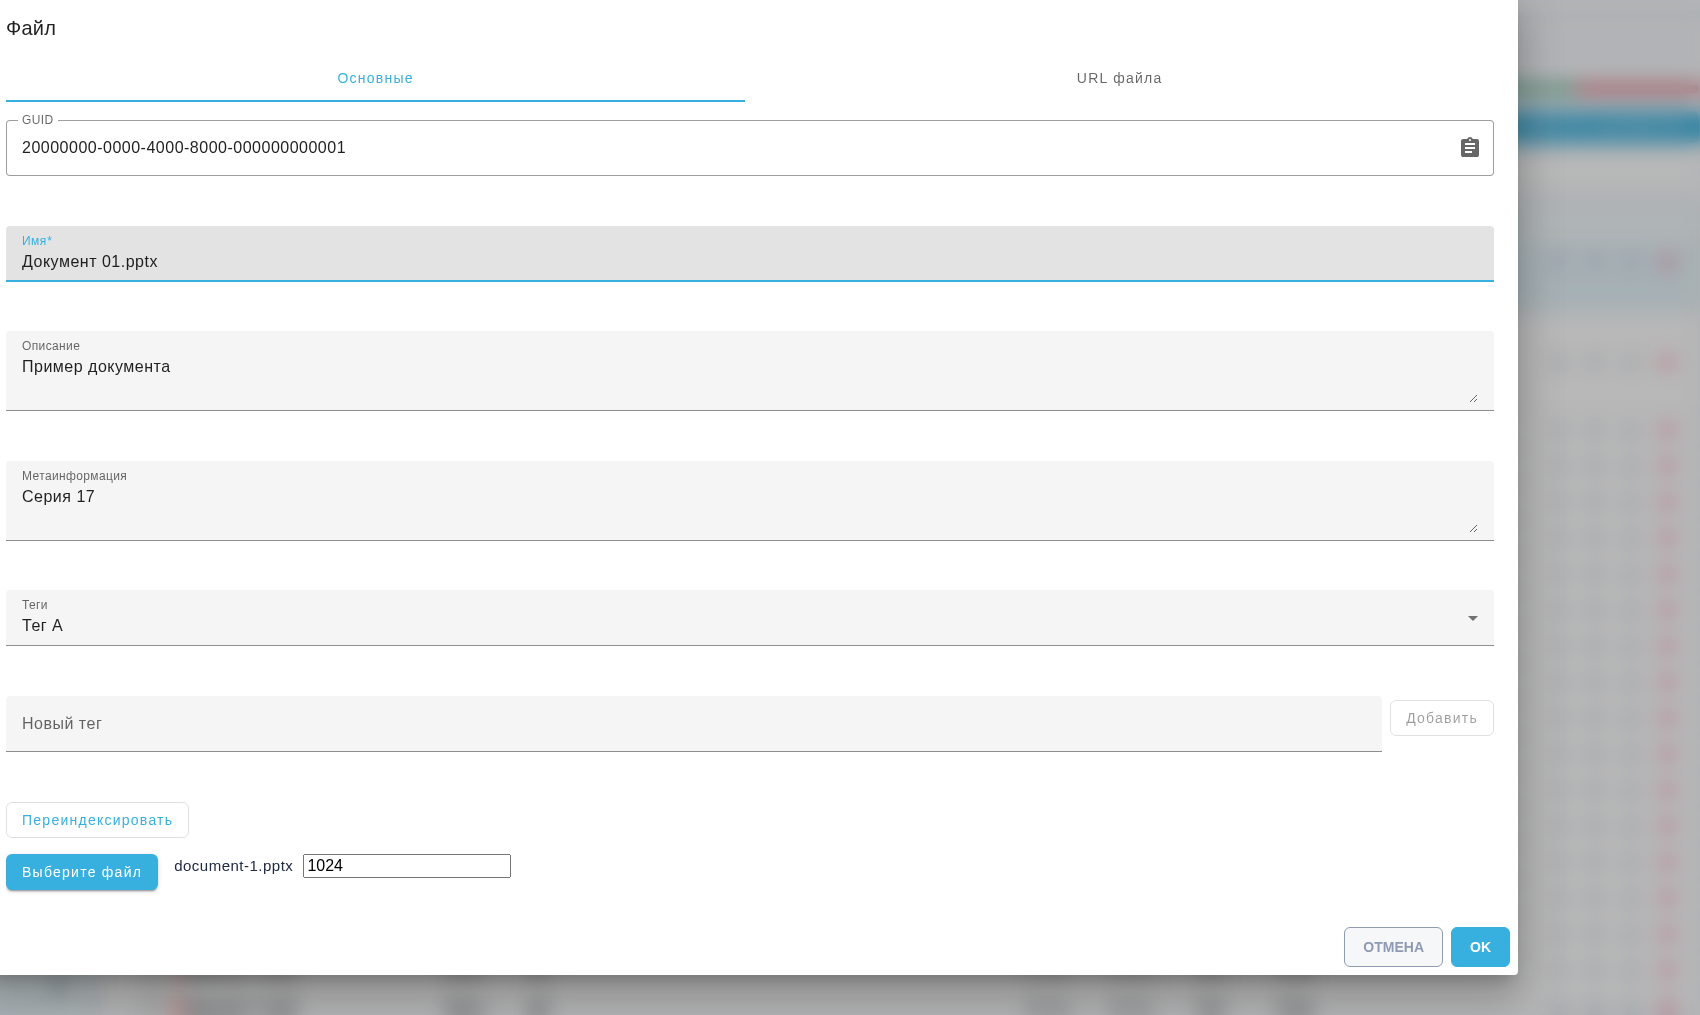
By default, the separate metainfo filter and column are hidden on the Documents screen. An administrator can set hide_document_metainfo_in_list to false in the interface appearance settings to display them. Stored values and the API metainfo field remain available to integrations. The search API parameter metainfo matches a substring of this field: for example, series matches "Series 17". This field does not affect content indexing or result ranking.
Manage the tag catalog#
A tag remains in the Account catalog after it is removed from an individual file. The tag itself is managed in the "Manage tags" popup.
Viewing requires permission to read Documents. Adding, renaming and deleting require the corresponding Role permissions to create, update and delete. Without these permissions the list is read-only. A tag name must be nonempty and at most 64 characters long. Duplicate catalog names are not allowed.
The catalog can be opened on the Documents screen in the table or "Indexing" view with the pencil button beside the "Tags" column filter. On narrow screens this button is beside the view buttons above the table.
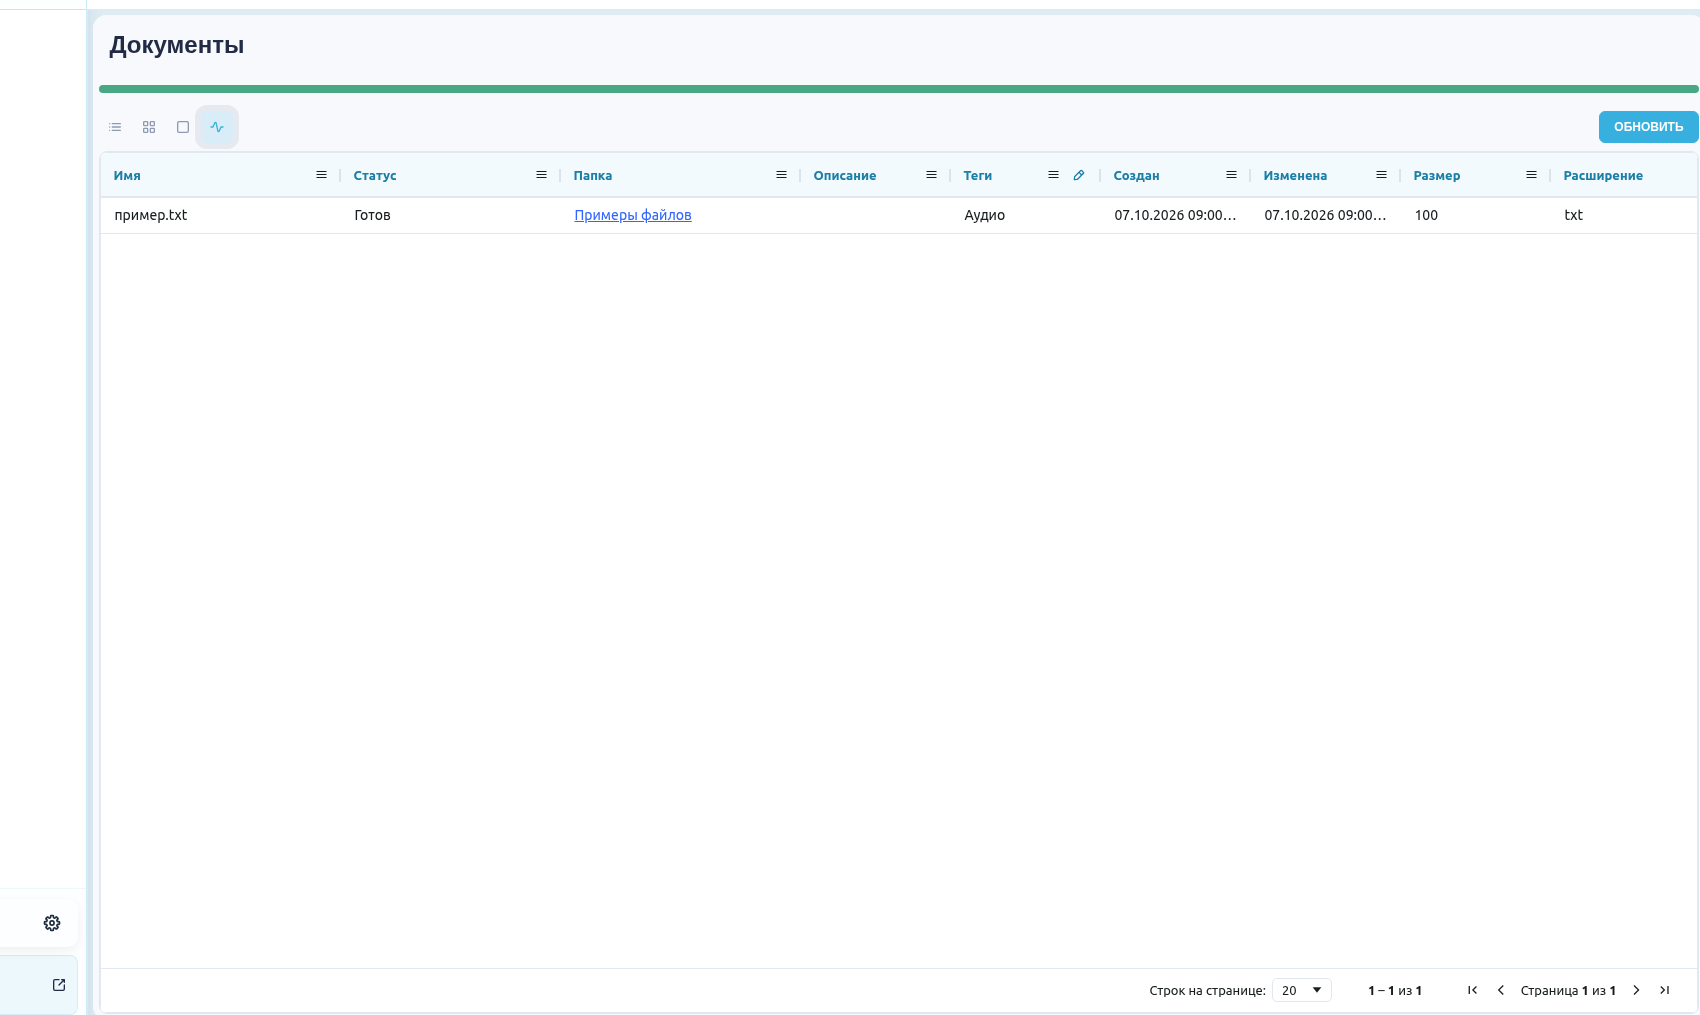
Button for opening the tag catalog. Interface shown in Russian.
The "Manage tags" popup opens with the Account's tag list.
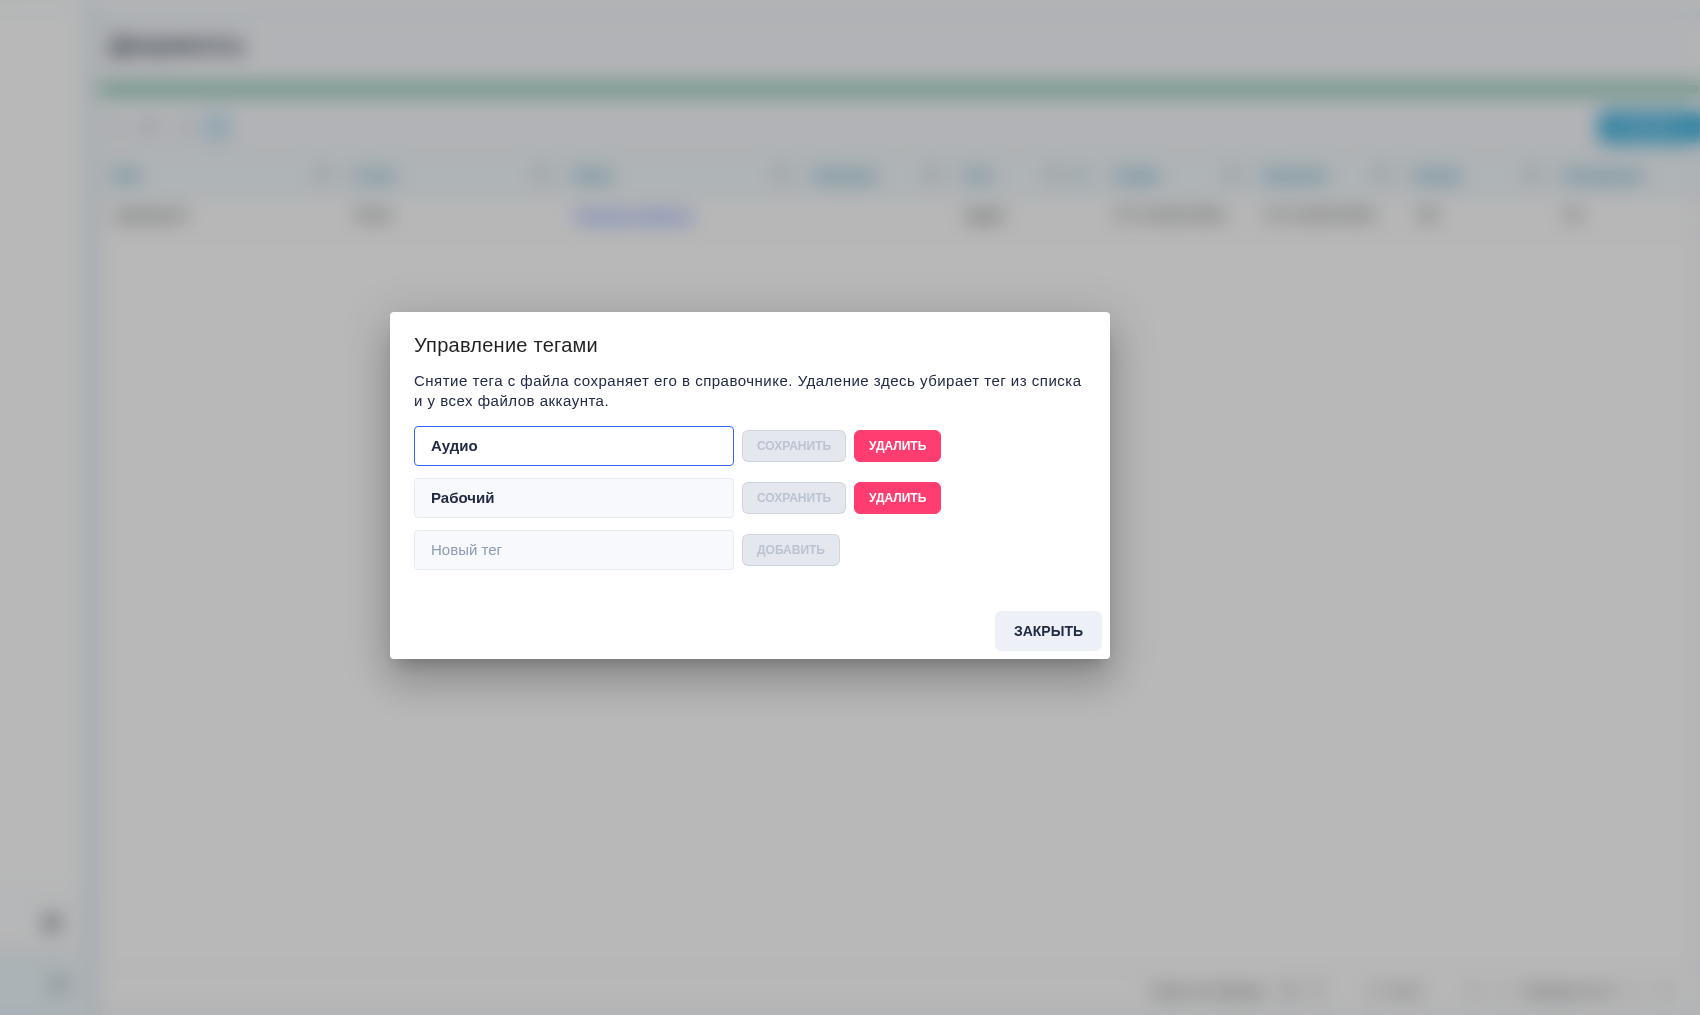
The Manage tags popup. Interface shown in Russian.
The popup offers the following independent actions:
Adding requires a name in "New tag", followed by "Add".
Renaming requires changing the name in the tag row, followed by "Save".
"Delete" in the tag row opens confirmation. "Yes" confirms deletion and "No" cancels it.
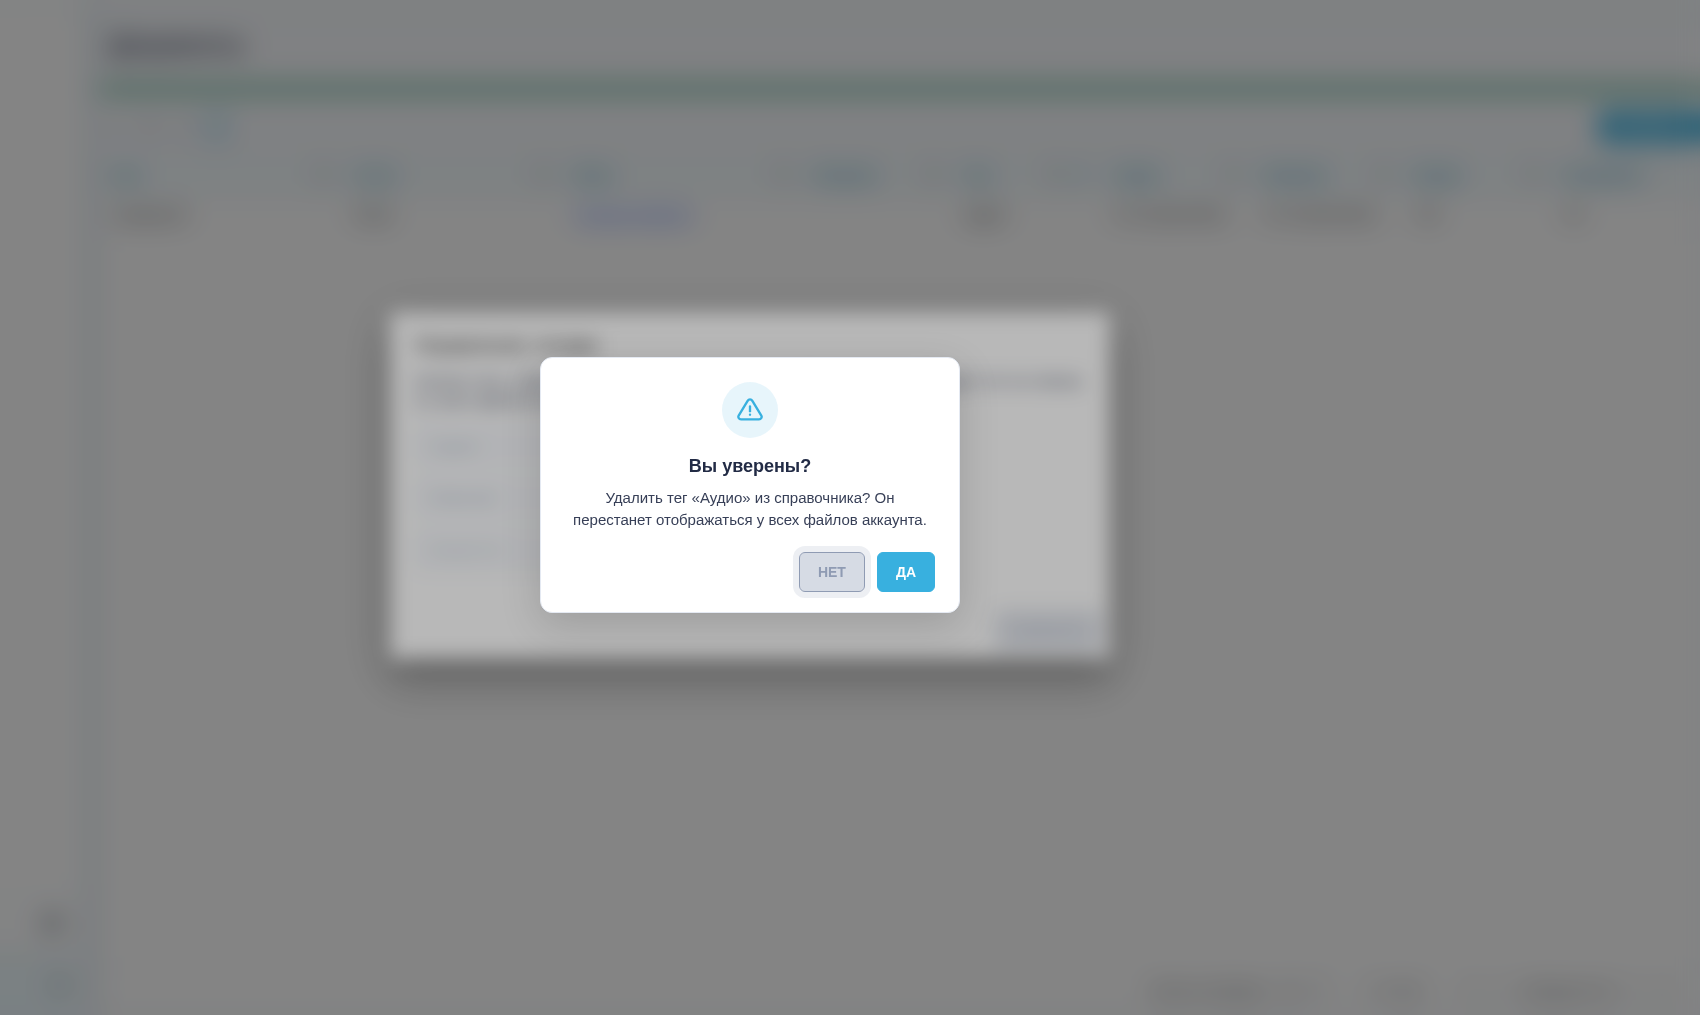
Confirmation of deleting a synthetic tag. Interface shown in Russian.
After confirmation the tag disappears from the catalog and the display of Account files. The files themselves are not deleted.
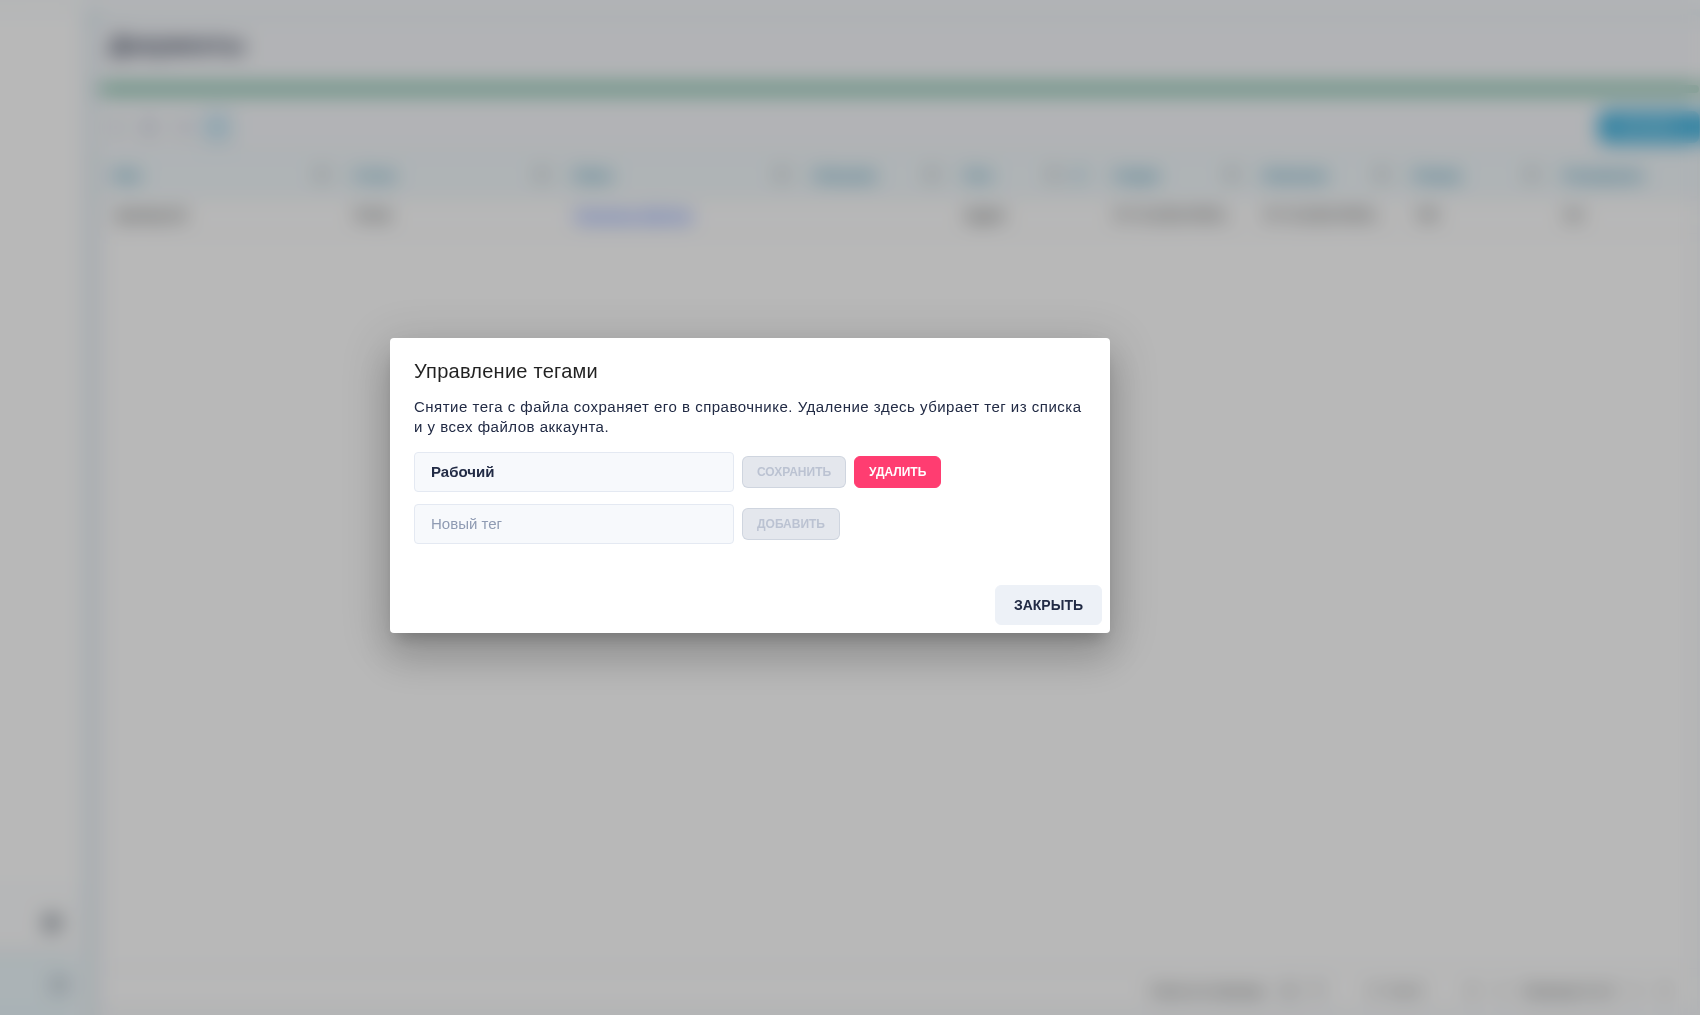
Catalog after deleting a synthetic tag. Interface shown in Russian.
"Close" returns to Documents. The catalog, file list and filter values refresh.
If the deleted tag was selected in the filter, that condition is removed. An error leaves changes unapplied in the popup. The message must be checked before retrying.
PDF indexing errors#
Starting reindexing and changing settings require the Role permission to update Documents. The reason for a failure appears in the "Status" column and its tooltip. Unknown failures retain the generic "indexing failed" message.
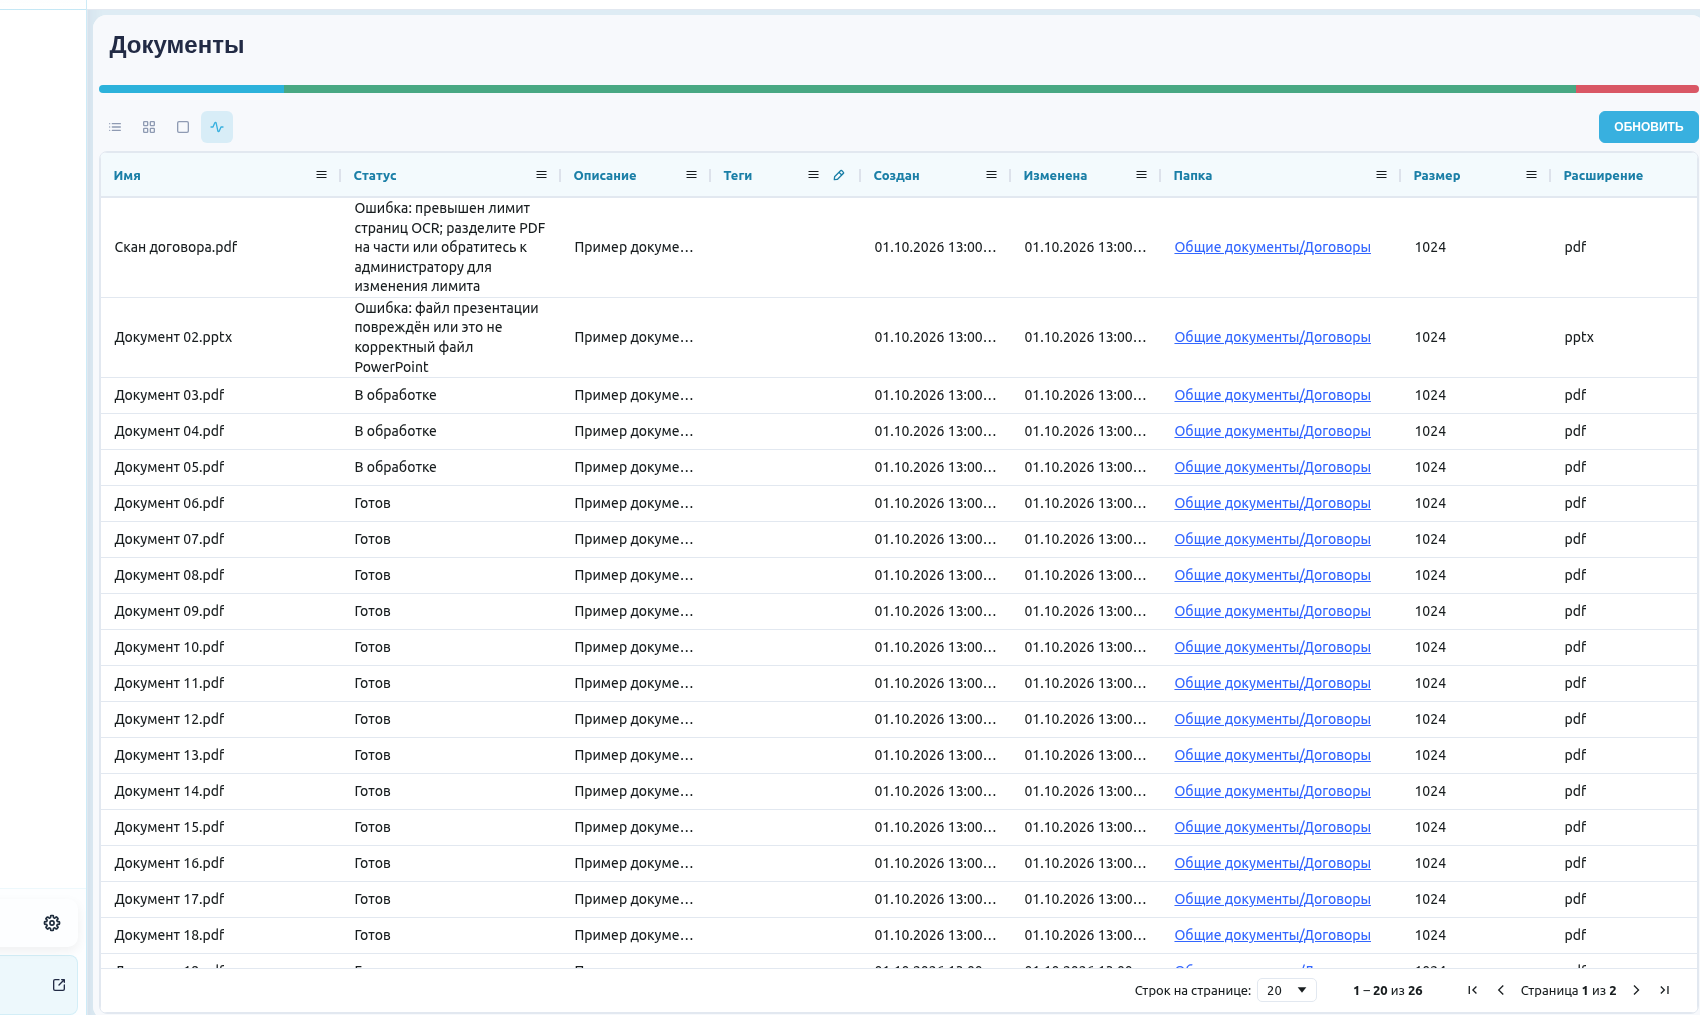
The error cause in the Status column. Interface shown in Russian.
A PDF with scanned pages requires recognition to be enabled: Tesseract or "Saved model". An image extending slightly beyond the page edge does not prevent OCR of its visible part. With OCR disabled, only the text layer is extracted; a scan without a text layer cannot be indexed.
| Reason | Action |
|---|---|
| No text is available for indexing | The OCR settings must be checked for a scanned PDF. If recognition is enabled but yields no text, the scan quality must be checked or a PDF with a text layer uploaded. |
| The OCR page limit was exceeded | The PDF must be split, or the administrator contacted to adjust PDF_OCR_MAX_PAGES. The page limit differs from the file size limit. |
| The PDF has no pages | A document containing at least one page must be uploaded. |
| Invalid OCR mode | A supported PDF recognition mode must be selected in the Documents settings. |
| No OCR model is selected | In "Saved model" mode, a Model must be selected in the Documents settings. |
| The model does not support OCR | A Multimodal or OCR Model must be selected. Access to the Model list requires permission to read Models. |
| The OCR model connection is not configured correctly | The administrator must check the recognition service's internal connection. |
| The PDF is password-protected or damaged | The password must be removed, or a new copy of the document saved and uploaded. |
After resolving the cause, the file must be opened and the "Re-index" button clicked. Successful processing results in "Ready" status without the previous error reason. If the failure recurs, the file name and text from the "Status" column must be provided to the administrator. Changing a setting alone does not confirm successful indexing.