
Models#
The Models screen is designed to manage Models and Model Instances available in Sherpa AI Server.
.png)
Users can choose between a local Model or a cloud-based one, provided they have the necessary tokens for access. Integration of a Model hosted on third-party servers within the local network is also possible (but not on the same server where Sherpa AI Server is located).
| № | Interface Element | Description |
|---|---|---|
| 1. | “Models” block | The upper area of the screen where the list of Models registered in the system is displayed. |
| 1.1. | “Create” button | Opens the form to create a new Model. |
| 1.2. | “Refresh” button | Refreshes the list of Models. |
| 1.3. | “Delete Selected” button | Allows you to delete selected Models. |
| 1.4. | “Export to CSV” button | Exports the list of Models to a CSV file. |
| 1.5. | “Export to XLSX” button | Exports the list of Models to an XLSX file. |
| 1.6. | Model selection checkbox .png) | Allows you to select one or more Models for performing bulk actions. |
| 1.7. | “Name” column | Displays the name of the Model. |
| 1.8. | “Description” column | Displays the description of the Model, if provided. |
| 1.9. | “Model Type” column | Defines the type of tasks the Model is intended for. Possible options:
|
| 1.10. | “Use Cases” column | Shows in which system scenarios the Model can be used.
|
| 1.11. | “Response Generation Parameter” column | The selected profile of response generation settings.
|
| 1.12. | “Access Folder” column | Displays the Access Folder to which the Model belongs. |
| 1.13. | “Created” column | Displays the date and time the Model was created. |
| 1.14. | “Modified” column | Displays the date and time the Model was last modified. |
| 1.15. | Edit button .png) | Allows you to open the selected Model to change its parameters. |
| 1.16. | Delete button .png) | Allows you to delete a specific Model. |
| 2. | “Model Instances” block | The lower area of the screen where instances of the selected Model are displayed. |
| 2.1. | Instance selection checkbox  | Allows you to select one or more Model Instances for performing bulk actions. |
| 2.1. | “Create” button | Opens the form to create a new Model Instance. |
| 2.2. | “Refresh” button | Refreshes the list of Model Instances. |
| 2.3. | “Delete Selected” button | Allows you to delete selected Model Instances.
|
| 2.4. | “Export to CSV” button | Exports the list of Model Instances to a CSV file. The button is inactive if no instances are selected. |
| 2.5. | “Export to XLSX” button | Exports the list of Model Instances to an XLSX file. The button is inactive if no instances are selected. |
| 2.6. | “Name” column | Displays the name of the Model Instance. |
| 2.7. | “Type” column | Displays the type of Model Instance, for example local. |
| 2.8. | “Location” column | Displays the address or location of the Model Instance, for example aiserver-llm-server:8000. |
| 2.9. | “Created” column | Displays the date and time the Model Instance was created. |
| 2.10. | “Modified” column | Displays the date and time the Model Instance was last modified. |
| 2.12. | Edit button .png) | Allows you to open the selected Model Instance to change its parameters. |
| 2.13. | Delete button .png) | Allows you to delete a specific Model Instance. |
| 3. | .png) | Allows you to specify how many records will be displayed in the table on one page. |
| 4. | .png) | Shows the range of records displayed on the current page and the total number of records in the table. |
| 5. | .png) | Allows you to navigate between pages of the table:
|
Selecting a Model on Other Screens of Sherpa AI Server#
Chat#
The "Model" field in the "Default Chat Settings" window allows you to select the Model that will be used by default for processing messages in the Chat. The selected Model determines how Sherpa AI Server will generate responses to the User, execute instructions from the system message, and operate in the specified mode.
.png)
Assistants#
The "Model" field in the "Edit Assistant" window allows you to select the Model that will be used by the Assistant to generate responses to the User. This field is mandatory and is applied when the "Response Source to User's Question" block has the option "Model Responds" selected.

Create Model#
The "Create Model" popup opens after clicking the "Create" button above the "Models" table and is intended for adding a new Model to Sherpa AI Server.
.png)
| No. | Interface Element | Description |
| 1. | section "Main" | Contains the basic parameters of the created Model. |
| 1.2. | field "Name" | Required field for entering the name of the Model. |
| 1.3. | field "Description" | Intended for entering a brief description of the Model. |
| 1.4. | field "Model Type" | Required dropdown field where the purpose of the created Model is selected. The selected type determines for which tasks the model will be used in Sherpa AI Server:
|
| 1.5. | field "Context Length (tokens)" | Allows specifying the maximum length of the Model's context in tokens. If the field is left empty, the global setting LLM_MAX_MODEL_LEN will be used. |
| 1.6. | field "Object Folders" | Allows selecting Object Folders for which the Model will be available. |
| 1.7. | block "Default" | Allows marking for which tasks the Model will be used by default:
Some options may be inactive as they are not available for the selected Model type or current configuration. |
| 2. | section "Generation Parameters (sampling)" | Contains settings for generating responses by the Model. These parameters affect the style, variability, length, and stability of the responses. |
| 2.1. | button "Advanced Generation Parameters" | Expands or hides detailed generation settings. |
| 2.2. | field "Preset" | Allows selecting a ready-made set of generation parameters.
|
| 2.3. | field "Temperature" | Determines the randomness of the response. The higher the value, the more diverse and creative the responses will be; the lower the value, the more stable and predictable they will be. |
| 2.4. | field "Top-p (nucleus)" | Limits the selection of tokens to the most probable options until their cumulative probability reaches the specified threshold. A lower value makes the responses stricter, while a higher value makes them more free. |
| 2.5. | field "Top-k" | Limits the selection of the next token to a specified number of the most probable tokens. A value of 0 disables this limitation. |
| 2.6. | field "Min-p" | Cuts off tokens with low probability relative to the best token. A value of 0 disables the parameter. |
| 2.7. | field "Presence penalty" | Adds a penalty for already encountered tokens and reduces the likelihood of repeating themes or phrases. |
| 2.8. | field "Repetition penalty" | Additionally penalizes the repetition of already generated text. A value of 1.0 means no penalty enhancement; values above 1 further reduce repetitions. |
| 2.9. | field "Max response tokens" | Allows specifying the maximum length of a single response from the Model. If the field is left empty, the value from the global system settings is used. |
| 3. | section "Advanced Mode" | Contains additional model settings intended for more precise configuration of the chat template and data transmission parameters to the Model. |
| 3.1. | button "JSON Template Parameters" | Expands or hides the block for configuring chat template parameters in JSON format. |
| 3.2. | block "Chat Template Parameters (JSON)" | Contains a field for entering additional chat template parameters in JSON format. |
| 3.3. | field "Chat template kwargs (JSON)" | Intended for entering a JSON object of additional arguments chat_template_kwargs, which are used when forming requests to the Model.A hint below the field explains that the entered JSON object is passed to chat/completions as chat_template_kwargs, is combined with the setting LLM_CHAT_TEMPLATE_KWARGS from .env, and the keys should not overlap. |
| 4. | button "Cancel" | Closes the window without creating the Model and without saving the entered data. |
| 5. | button "OK" | Creates the Model with the specified parameters.
|
Create Model Instance#
The "Create Instance" popup is intended for adding a new Model Instance to Sherpa AI Server.
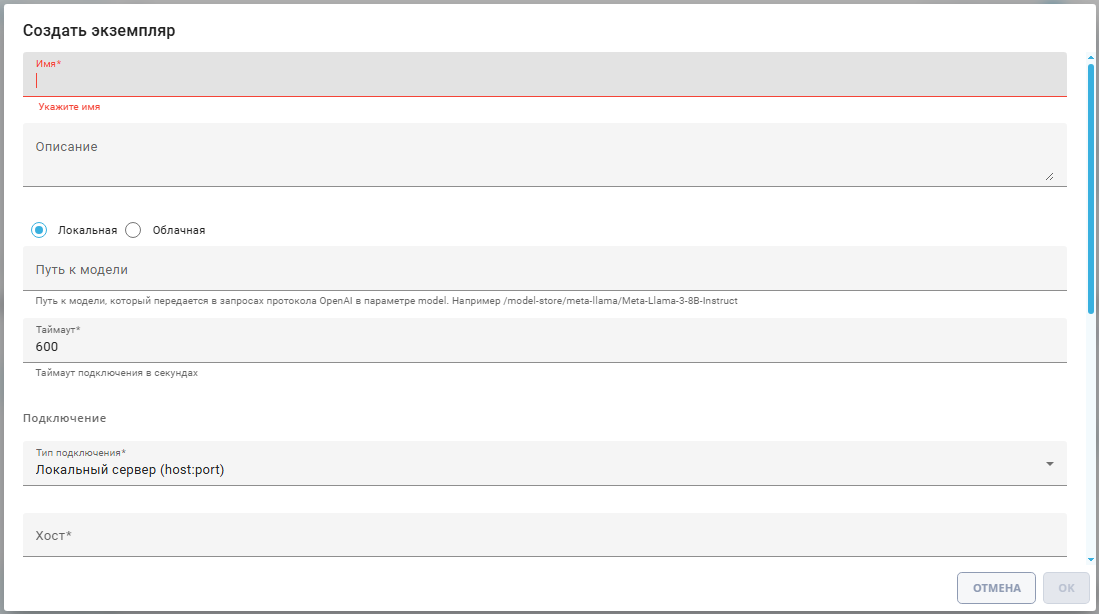
| No. | Interface Element | Description |
| 1. | field "Name" | Required field for entering the name of the created instance. |
| 2. | field "Description" | Intended for entering a brief description of the model instance. |
| 3. | switch "Local / Cloud" | Allows you to choose the type of deployment for the model instance: local or cloud. |
| 4. | field "Path to Model" | Intended for specifying the path to the model, which will be passed in OpenAI protocol requests in the model parameter. The hint provides an example path: /model-store/meta-llama/Meta-Llama-3-8B-Instruct. |
| 5. | field "Timeout" | Required field for specifying the connection timeout in seconds. |
| 6. | section "Connection" | Contains connection parameters for the model instance. |
| 6.1. | field "Connection Type" | Required dropdown field for selecting the connection method. |
| 6.2. | field "Host" | Required field for specifying the address of the local server where the model instance is available. |
| 6.3. | field "Port" | Required field for specifying the port on which the local server of the model instance is available. |
| 6.4. | field "Schema" | Dropdown field for selecting the connection schema to the server. |
| 6.5. | field "Subpath" | Intended for specifying the prefix path to the OpenAI protocol. The hint explains that, for example, for the route |
| 6.6. | field "Protocol" | Required dropdown field for selecting the protocol for interacting with the model instance. |
| 7. | section "Authorization" | Contains authorization parameters when connecting to the model instance. |
| 7.1. | field "Authorization Type" | Required dropdown field for selecting the authorization method. |
| 7.2. | button "Check Connection" | Allows you to check the availability of the model instance and the correctness of the specified connection parameters. |
| 8. | button "Cancel" | Closes the window without creating an instance and without saving the entered data. |
| 9. | button "OK" | Creates a model instance with the specified parameters. The button is inactive if the required fields are not fully filled. |
Edit Model#
To view/edit the properties of the Model group, you need to select the desired group from the list and click the button .png) . After that, a form with Model settings will open, where you can make the necessary changes. There are no new fields in the previously created Model.
. After that, a form with Model settings will open, where you can make the necessary changes. There are no new fields in the previously created Model.
.png)
Edit Model Instance#
To view/edit the properties of the Model Instance, you need to select the desired instance from the list and click the button . After that, a form with Model Instance settings will open, where you can make the necessary changes. There are no new fields in the previously created Model Instance.
.png)
If the agent reports exceeding context#
The context includes chat history, document fragments, and tool descriptions. Part of the model window is reserved for the response. Therefore, a short question may be accompanied by a large request.
On builds with precise counting fixes, the agent clarifies the size of the large request with the local model tokenizer before context truncation or rejection. If the tokenizer is unavailable, a cautious estimate is used.
If the error persists, try a new thread with a short question and one small document. For truly large requests, reduce the input data or choose a model with a larger window. If the error occurs immediately in a new thread, provide the administrator with the time, server version, selected model, mode, and thread ID. The administrator checks the availability of the tokenizer and the actual size of the request, including tools.
The "Context Length (tokens)" field must correspond to the capabilities of the running model instance. Increasing this field alone does not expand the engine's window.