
Assistants#
In Sherpa AI Server, there are two sections for Assistants:
- Assistants for Chat — used to select the Assistant with whom the User will interact.
- Assistants in the navigation menu — used to create and configure Assistants.
Both sections are interconnected: Assistants created in the management menu can be available for the User to select and further work with in Chat.
Assistants for Chat#
The Assistants section in the workspace is intended for selecting the Assistant that will be used in Chat.
.png)
This section displays a list of available Assistants. The User can select the desired Assistant for work or go to the "All Assistants" list, similar to the Assistants section in the navigation menu.
The selected Assistant is displayed on the right side of the screen and is used to process User messages and perform available actions.
Assistant Context Menu#
Clicking on the three dots next to the Assistant's name opens a context pop-up menu. The name of the selected Assistant is displayed at the top of the menu.
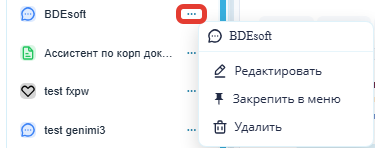
The menu offers the following actions:
- "Edit" — go to change the Assistant's settings.
- "Pin to menu" — add the Assistant to the pinned list for quick access.
- "Delete" — remove the selected Assistant.
Assistants in the Navigation Menu#
The Assistants section in the navigation menu is intended for creating and configuring personalized Assistants.
.png)
In this section, the User can open the "Create Assistant" window and set the parameters for the new Assistant: name, description, system message, model, moderator, MCP servers, API token, files, folders, and other settings.
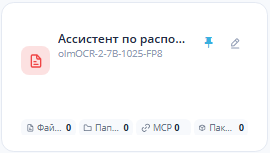
Assistants are displayed as cards. Each card shows the Assistant's name, the Model used, a brief description or purpose, and the number of related resources: files, folders, MCP servers, and Object Folders.
At the top of the screen, there are:
- "Search by assistant name" field;
- "Sort" dropdown list;
- "Create Assistant" button.
Quick actions are available on the Assistant card: pinning the Assistant .png) and going to edit
and going to edit .png) . Pinned Assistants are displayed according to the selected sort order.
. Pinned Assistants are displayed according to the selected sort order.
The "Search by assistant name" field allows you to quickly find the desired Assistant in the list. It is necessary to enter part of the name or the full name of the Assistant to filter the cards on the screen. If there are no matches, the list will not display suitable cards.
.png)
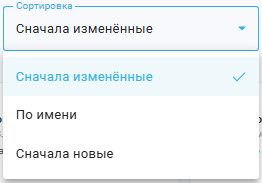
The "Sort" dropdown list sets the order of displaying Assistants. Sorting helps to find relevant or recently edited cards faster.
| Sort Option | Description |
|---|---|
| Recently Modified | Items that have been modified are displayed at the top of the list. |
| By Name | Items are sorted by name in alphabetical order. |
| Recently Created | Recently created items are displayed at the top of the list. |
The "Create Assistant" button opens the form to create a new Assistant. After clicking, the User proceeds to set the Assistant's parameters: name, description, and related resources.
.png)
Pop-up Window "Create Assistant"# #
.png)
Includes the following fields:
- Name *
This field is intended for entering a unique name for the Assistant. The specified name will be used by Users when addressing the Assistant. For example, "Your assistant" or "Support service".
- Description
In this field, you can specify what tasks the Assistant can perform and/or provide brief information about its functionality. This will help Users understand how to best interact with the Assistant.
- Assistant Icon
This field allows you to select an icon for the Assistant.
- Assistant Color
This field allows you to select the color of the Assistant's icon.
- System Message
In this field, you can specify a system message that will be sent to the Assistant for processing requests. This message may contain instructions on how the Assistant should behave, what style to respond in, or what information to use.
For example: "You are a polite, professional, and detail-oriented intelligent assistant who responds to the user in detail in Russian to the posed question."
An informational message is displayed next to the "System Message" field when hovering over the information icon .png) .
.
.png)
Tooltip text: "Instructions that the assistant always follows: role, tone, and response rules."
.png)
- Use reranker to improve search
Allows you to enable or disable the use of a reranker model for additional ranking of search results. When enabled, the system re-evaluates the found fragments and raises the most relevant results higher, improving the quality of responses when searching through documents or knowledge bases.
An informational message is displayed next to the "Use reranker to improve search" option when hovering over the information icon  .
.
.png)
Tooltip text: "Re-sorts search results so that the most relevant document fragments are included in the response."
- Temperature
The slider allows you to adjust the creativity of the Assistant's responses — the higher the value, the more random and less predictable responses it will generate. This can be useful in situations where more variety in responses is required.In the upper right corner, a counter is displayed  , where you can check the value in digital equivalent or enter it manually.

The "Temperature" setting allows you to adjust the creativity of the neural network using a scale from 0 to 1, where:
- 0 – no creativity. All responses to the same questions will be almost identical, strict, and concise. This mode is suitable for situations where precise answers or solutions to code generation tasks are required.
- 1 – maximum degree of creativity. All responses from the neural network will be different and unpredictable. Suitable for writing articles and creative texts.
By default, the "Temperature" value is set to 0.1.
An informational message is displayed next to the "Temperature" parameter when hovering over the information icon .
.png)
Tooltip text: "How 'creative' the responses are: closer to 0 — more stable and predictable; closer to 1 — more diverse."
- Source of the user's question response
The "Source of the user's question response" setting block allows you to choose who will formulate the response in the chat.
Two options are available:
| Option | Description |
|---|---|
| Model responds | The response to the User is formulated by the selected language model. |
| Awaiting response via API | The system is waiting for a response from an external system via API. |
An informational message is displayed next to the block title when hovering over the information icon .
.png)
Tooltip text: "Who responds in the chat: the selected model or an external system via API."
- Model
A dropdown list for selecting the language Model used by the Assistant. Available options:
- env-model;
- ChatGPT;
- Qwen3.6-35B-A3B-AWQ;
- openrouter;
- olmOCR-2-7B-1025-FP8.
.png)
The list of Models is provided as an example. When creating a new User Account, the "Model" section may be empty. The user can independently add, configure, and connect the necessary language models for their tasks.
- Moderator
Allows you to select one of the sets of moderation rules formed on the Moderation tab.
.png)
The field expands into a list of available options. The value "No moderation" means that additional moderation of messages is not used. The "Personal data cleansing" option is applied to process messages to remove or mask personal data.
An informational message is displayed next to the "Moderator" field when hovering over the information icon .
.png)
Tooltip text: "Optional checking of messages and responses according to moderation rules. Can be disabled."
- MCP servers
Allows you to select one or more MCP servers that will be available to the Assistant for performing external actions and obtaining data through connected tools. The field expands into a list with checkboxes. The user can mark the necessary servers, for example, https://mcp.tavily.com/mcp or https://reader.ru.tuna.am/mcp.
.png)
An informational message is displayed next to the "MCP servers" field when hovering over the information icon .
.png)
Tooltip text: "External tools that the assistant can call (MCP). Leave empty if tools are not needed."
- Agent API token
Allows you to select the API token that will be used by the Assistant/Agent when making requests to external services or APIs. The field expands into a list of available tokens. The value "No API token" means that the Agent will operate without an attached API token.
.png)
An informational message is displayed next to the "Agent API token" field when hovering over the information icon .
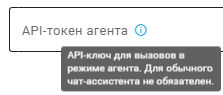
Tooltip text: "API key for calls in agent mode. Not required for a regular chat assistant."
.png)
- INTERPRETER LIBRARIES
Displays the number of selected interpreter libraries and allows you to go to their settings.
The counter of selected libraries shows their number out of the total number available.
.png)
The "Change interpreter libraries" button opens a window for selecting interpreter libraries, where the User can change the set of libraries available to the Assistant/Agent when executing code.
.png)
| No. | Interface Element | Description |
| 1. | Search Field | Allows you to find the desired library by name. |
| 2. | "Select All" Button | Allows you to select all available interpreter libraries. |
| 3. | "Deselect All" Button | Allows you to deselect all interpreter libraries. |
| 4. | Selected Libraries Counter
| Shows the number of selected libraries out of the total available. |
| 5. | Library List .png) | Displays the available interpreter libraries. Each row contains a checkbox, the library name, version, and a brief description. |
| 5.1. | Library Checkbox | Allows you to include or exclude a specific library from the set available to the interpreter. |
| 5.2. | Library Name and Version | Displays the library name and the installed version, for example attrs (26.1.0), charset-normalizer (3.4.6), contourpy (1.3.3), cycler (0.12.1). |
| 5.3. | Library Description | Briefly explains the purpose of the library. |
| 6. | Scroll Bar | Allows you to view the full list of libraries if it does not fit in the window area. |
| 7. | "Cancel" Button | Closes the window without saving any changes made. |
| 8. | "Save" Button | Stores the selected set of interpreter libraries and closes the window. |
.png)
- Dialog Files
Designed for adding files that will be used in the dialog with the Assistant/Agent. After adding, the files can be used as context for processing requests, analyzing data, or generating responses.
The "Add File" button opens a file selection dialog and allows you to attach a document or other file to the dialog.
.png)
- Dialog Folders
Designed for adding folders that will be used in the dialog with the Assistant/Agent. Added folders can provide context for searching, analyzing data, and generating responses.
The "Add Folder" button allows you to specify folders where the Assistant's dialogs will be stored.
.png)
- Access Folders
Selection of directories that the Assistant has access to. Defines the areas of data available for analysis in dialogs.
.png)
- Object Folders
A dropdown list for selecting the Object Folder, the materials of which will be used in the configuration or operation of the Assistant.
.png)
The user can select the desired folder from the list, for example: "Supply Department", "Legal Department", "HR", "Accounting Department".
After selection, the value is displayed in the "Object Folders" field and determines which objects or materials the Assistant will refer to.
Example: speaker names in a transcript#
This example labels turns after audio diarization. The assistant assigns a name only after two independent direct addresses followed by the next speaker's reply, or after a clear self-introduction in that speaker's own turn. Insufficient or conflicting evidence leaves the label unchanged.
Creating and using the Assistant requires permission to read and create Assistants, read the selected Model and access the Chat. Diarization splits an audio recording into turns by different speakers.
The Assistant can be created and used as follows:
- It is necessary to open Assistants in the navigation menu and select "Create an assistant". It is necessary to enter a name such as "Speaker names" and a description.
- It is necessary to choose a model, paste the text below into "System prompt", and save the assistant.
- In Chat, this assistant and "Agent" mode must be selected. It is necessary to provide a complete diarized transcript such as
[0:00:05] speaker_1: Hello, or use theтранскрибация_файла_*file in the same chat. It is necessary to ask it to relabel the complete transcript while preserving the words and timestamps. - It is necessary to check the result: a supported name looks like
Ivan (speaker_2); an unknown speaker keeps the original label. Words, timestamps, and turn order must match the source.
System prompt:
You resolve names in diarized meeting transcripts. Treat the transcript as the only evidence. Labels may look like `speaker_1` or `SPEAKER_00`.

Before answering, read the complete transcript. If a `транскрибация_файла_*` thread file is available, use `aiserver_thread_file_read_text` to read it. Read in small pages with `limit_lines=20` and start at `offset_line=1`. If the tool response contains `offset_line`, `lines_returned`, and `truncated`, advance to `offset_line + lines_returned` while `truncated` is true. If the agent receives only a truncated output preview without these fields, retry the same offset with a smaller `limit_lines` (halve it down to 1) instead of guessing the next offset. If one line is still too large, stop and ask for a shorter complete transcript. After the first successful page, use `total_lines` to estimate remaining page reads and reserve at least two agent steps for evidence review and the final answer. If the remaining agent iteration budget cannot cover every page, stop and ask for a shorter complete meeting excerpt or for the administrator to increase `MCP_AGENT_MAX_ITERATIONS`; never return a partially relabeled file. Review evidence across all successfully read pages before assigning any name; use `aiserver_thread_file_grep` to revisit relevant passages when necessary. Otherwise use the complete `audio_chunk` transcript in the message. If the entire file cannot be read within the agent's context, tell the user the limit and ask for a shorter complete transcript; do not relabel a partial transcript. Do not infer identities from outside knowledge, topic, role, voice, or likely attendance.

For each name mention, classify it privately as DIRECT_ADDRESS, INTRODUCTION, THIRD_PERSON_REFERENCE, SELF_REFERENCE, or AMBIGUOUS. A direct address or introduction creates a candidate for the label in the immediately following substantive diarized turn. A short acknowledgement or overlap may be skipped only when it is clear that it does not answer the address. If the next speaker is ambiguous, discard the event. Third-person mentions and ambiguous mentions create no candidate.

Assign a name to a label only when two independent direct-address-to-next-turn events in different parts of this transcript support the same name and label. A clear first-person introduction such as "Я Иван" or "This is Ivan speaking" in that label's own diarized turn is sufficient by itself. Do not count repeated words in one exchange as independent events. Do not use an introduction attributed to a different label. If evidence conflicts, or if one name could refer to several labels without enough label-specific evidence, leave the label anonymous.

Produce the complete transcript in its original order. Change only the speaker label of a sufficiently identified turn to `<name> (<original label>)`, for example `Иван (speaker_2)` or `Ivan (SPEAKER_01)`. Keep every original label in parentheses even when two speakers share the same name. For unproven labels, keep the original label exactly. Preserve all utterance wording, punctuation, timestamps, line breaks, and turn boundaries exactly. Do not add a preface, summary, confidence score, or evidence list to the transcript. If the source cannot be read in full, say what is missing instead of producing a partial or guessed relabeling.
If the complete text is unavailable, it must be uploaded to the same Chat before retrying. If the transcript lacks sufficient evidence for a name, the assistant must not guess an identity. The result must be compared with the original transcription before further use: a Model can violate the instruction.
The system message reads the file in pages of 20 lines and reserves steps for checking evidence and answering. The iteration limit must allow the entire file to be read. If it is insufficient, provide a shorter complete meeting excerpt or ask the administrator to increase MCP_AGENT_MAX_ITERATIONS. Partial relabeling must not be used.