Solution#
Solution — a repository that combines several different projects in one place.
.png)
Project — a collection of diagram files, where one of the diagrams is designated as the main one. A project is described by a file with the .sherpa extension.
After adding a project to the solution and clicking on its name, you can view the diagrams of the current project, as well as add, delete, rename diagrams, and change their order.
It is allowed to open diagram files in the program that are not part of the current project.
There are 4 types of files within a project:
- A file with the
.sherpaextension – project file. - A file with the
.sherpaxextension – solution file. - Files with the
.processextension – file of a specific process diagram. - A file with the
.robotextension – compiled Robot file.
A fully assembled and debugged Robot does not need files with the
.sherpaand.processextensions; they are only needed during the development stage.
Interface Elements in the “Solution” Tab#
| No. | Interface Element | Description |
| 1. | Button .png) | Allows you to make the selected diagram the main one in the project. |
| 2. | Button .png) | Allows you to add the selected diagram to the project. |
| 3. | Button .png) | Allows you to add a new diagram to the project. |
| 4. | Button .png) | Allows you to add a new folder to the project. |
| 5. | Button .png) | Allows you to cut the selected diagram or folder. |
| 6. | Button .png) | Allows you to copy the selected diagram or folder. |
| 7. | Button .png) | Allows you to paste the previously cut or copied diagram or folder. |
| 8. | Button .png) | Allows you to delete the selected diagram or folder. |
| 9. | Button .png) | Allows you to rename the selected diagram or folder. |
| 10. | Button .png) | Allows you to commit changes to the project, that is, save the edits as the current version. |
| 11. | Button .png) | Allows you to remove the project from the solution. |
 — a button that allows you to add a new project to the list of available projects for editing within the Solution.
Project Context Menu#
To invoke the context menu, you need to right-click on the project name.

The project context menu offers the following options:
| No. | Option | Description |
| 1. | “Add” item | Allows you to add new elements to the project, such as a diagram, file, or folder. |
| 2. | “Make Project Active” item | Allows you to mark the selected project as the current one to work with. |
| 3. | “Import All Files from Folder” item | Allows you to load all files located in the specified folder into the project. |
| 4. | “Correct Link Paths” item | Allows you to update or correct link paths in the project if they have changed. |
| 5. | “Find Unused Diagrams” item | Allows you to find diagrams that are in the project but are not used anywhere. |
| 6. | “Paste” item | Allows you to paste a previously cut or copied file. |
| 7. | “Rename” item | Allows you to change the name of the project. |
| 8. | “Open in Explorer” item | Allows you to open the project folder in Explorer. |
| 9. | “Project Properties” item | Allows you to open a window with project parameters and settings. |
| 10. | “Remove from Solution” item | Allows you to remove the project from the solution without deleting files from the project folder. |
Links#
Links – are external libraries that the Robot can use during its operation.
To add a new link, you need to right-click on the “Links” item and select “Add Link”.
.png)
After that, the “Link Manager” window will open, allowing you to select the necessary assemblies (DLL files) provided by the Framework or add your own assembly.
.png)
Video Demonstration of Using Links with an Example of Connecting Your Library in C##
Project Folder Context Menu#
To invoke the context menu, you need to right-click on the name of the desired project folder.

The project folder context menu offers the following options:
| No. | Option | Description |
| 1. | “Add” item | Allows you to add:
|
| 2. | “Import All Files from Folder” item | Allows you to import all files from the folder from the selected directory. |
| 3. | “Correct Link Paths” item | Allows you to correct link paths within the selected folder to the specified folder. |
| 4. | “Find Unused Diagrams” item | Allows you to delete unused diagrams from the project. |
| 5. | “Paste” item | Allows you to paste the selected project folder. |
| 6. | “Cut” item | Allows you to cut the selected project folder. |
| 7. | “Copy” item | Allows you to copy the selected project folder. |
| 8. | “Rename” item | Allows you to rename the selected project folder. |
| 9. | “Delete” item | Allows you to delete the selected project folder. |
| 10. | “Open in Explorer” item | Allows you to open the project folder in Explorer. |
| 11. | “Project Properties” item | Allows you to open the “Project Properties” window. |
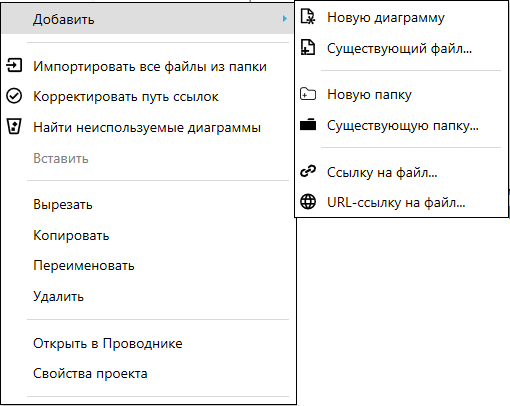
Context Menu within the “Add” ItemThe context menu of the project file, which is invoked by hovering over the "Add" item:#
| No. | Option | Description |
| 1. | “New Diagram” item | Creates a new diagram for visual representation of the process, scheme. |
| 2. | “Existing File” item | Allows you to select and connect an already existing file from the system for use in the project. |
| 3. | “New Folder” item | Creates a new folder for organizing and storing related items. |
| 4. | “Existing Folder” item | Connects an already existing folder from the file system. |
| 5. | “Link to File” item | Creates a link to an external file or resource, allowing access through the project. Also, all changes in this diagram will be applied to all projects. When performing a Push operation in Orchestrator, this file will be automatically added to the project. |
| 6. | “URL Link to File” item | Adds a hyperlink to an external file or internet resource by URL for quick access from the project. |
Project File Context Menu#
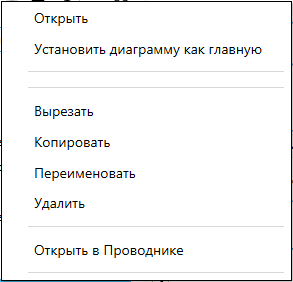
The context menu of the project file, which is invoked by right-clicking:
| No. | Option | Description |
| 1. | “Open” item | Allows you to open the selected file. |
| 2. | “Set Diagram as Main” item | Allows you to set the selected diagram as the main one. |
| 3. | “Cut” item | Allows you to cut the selected file. |
| 4. | “Copy” item | Allows you to copy the selected file. |
| 5. | “Rename” item | Allows you to rename the selected file. |
| 6. | “Delete” item | Allows you to delete the selected file. |
| 7. | “Open File in Explorer” item | Shows the path to the selected file on your computer. |