
VNC server#
The VNC server context-menu item is used to control the built-in VNC server, which allows remote access to the robot desktop.
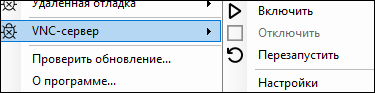
The popup menu includes the following commands:
- Enable — starts the VNC server and makes remote access available.
- Disable — stops the VNC server. After disabling it, you can no longer connect to the robot desktop over VNC.
- Restart — stops and starts the VNC server again. Use this command if the connection is not working correctly or if settings need to be applied after a change.
- Settings — opens the VNC server settings window, where you can change the remote-access configuration.
If Disable is inactive, the VNC server is not currently running.
Settings#
After clicking the "Settings" button, the Settings - Sherpa Assistant popup opens on the VNC server tab, which contains the VNC server connection and startup settings.

The window includes the following fields and settings:
- Robot VNC port — the port used for the VNC connection to the robot. For example, port
5907. - VNC password — the password for connecting to the VNC server. The value is hidden with dots.
- Start VNC server when the robot starts — enables automatic startup of the VNC server together with the robot.
- Automatically start the VNC server when an Unattended robot starts — enables automatic startup of the VNC server for an unattended robot.
- Assistant VNC port — the port used for the VNC connection to the assistant. For example, port
5908is specified. - Start VNC server when the assistant starts — enables automatic startup of the VNC server together with Sherpa Assistant.
- Open ports in Windows Firewall — a link for adding allow rules in the Windows firewall so that connections to the specified VNC ports are not blocked.
- RA2 fingerprint — a unique certificate/key fingerprint for the current computer. It can be used to verify the connection.
- Copy — copies the RA2 fingerprint value to the clipboard.
To save the changes, click OK. To close the window without applying changes, click Cancel.